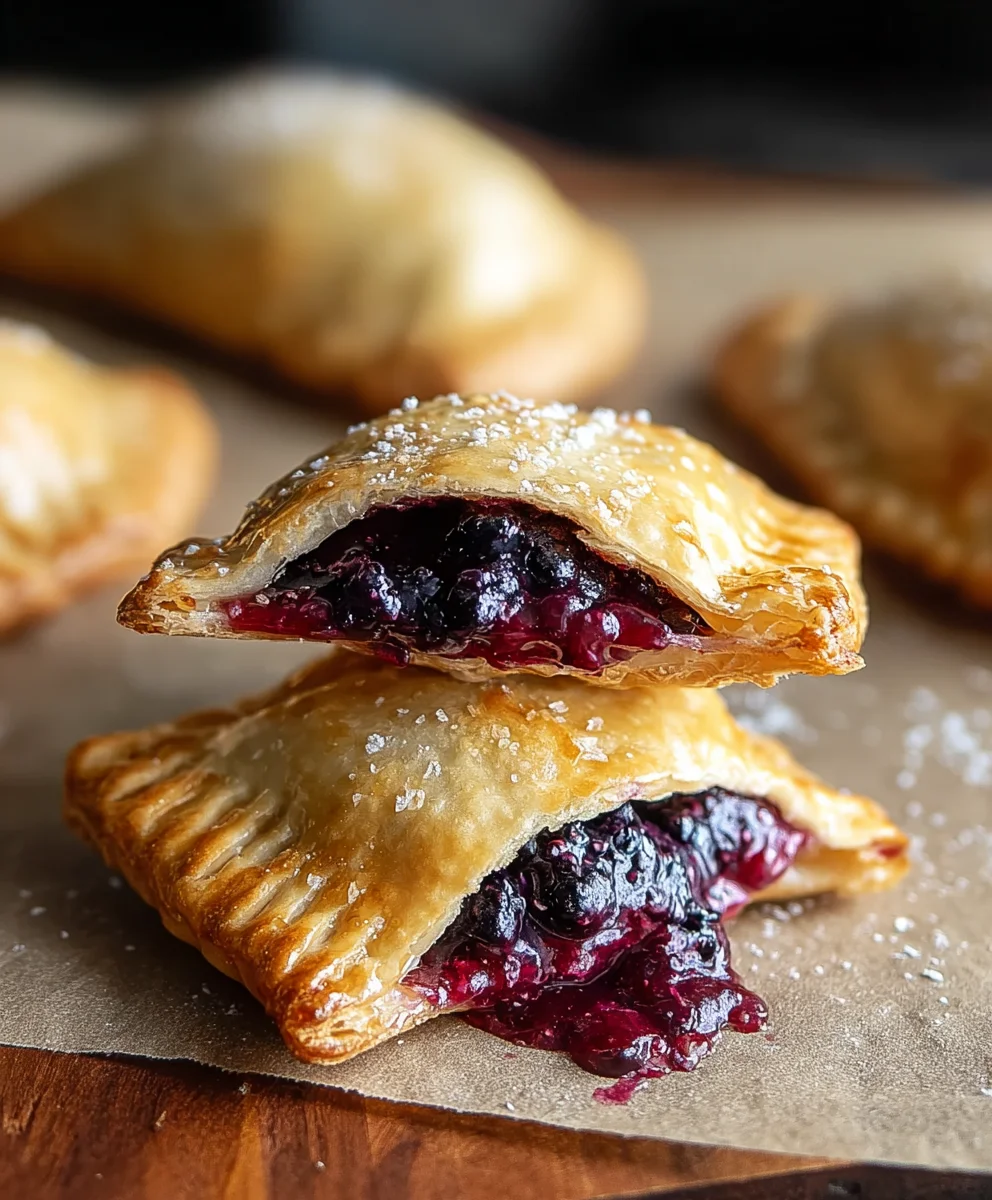
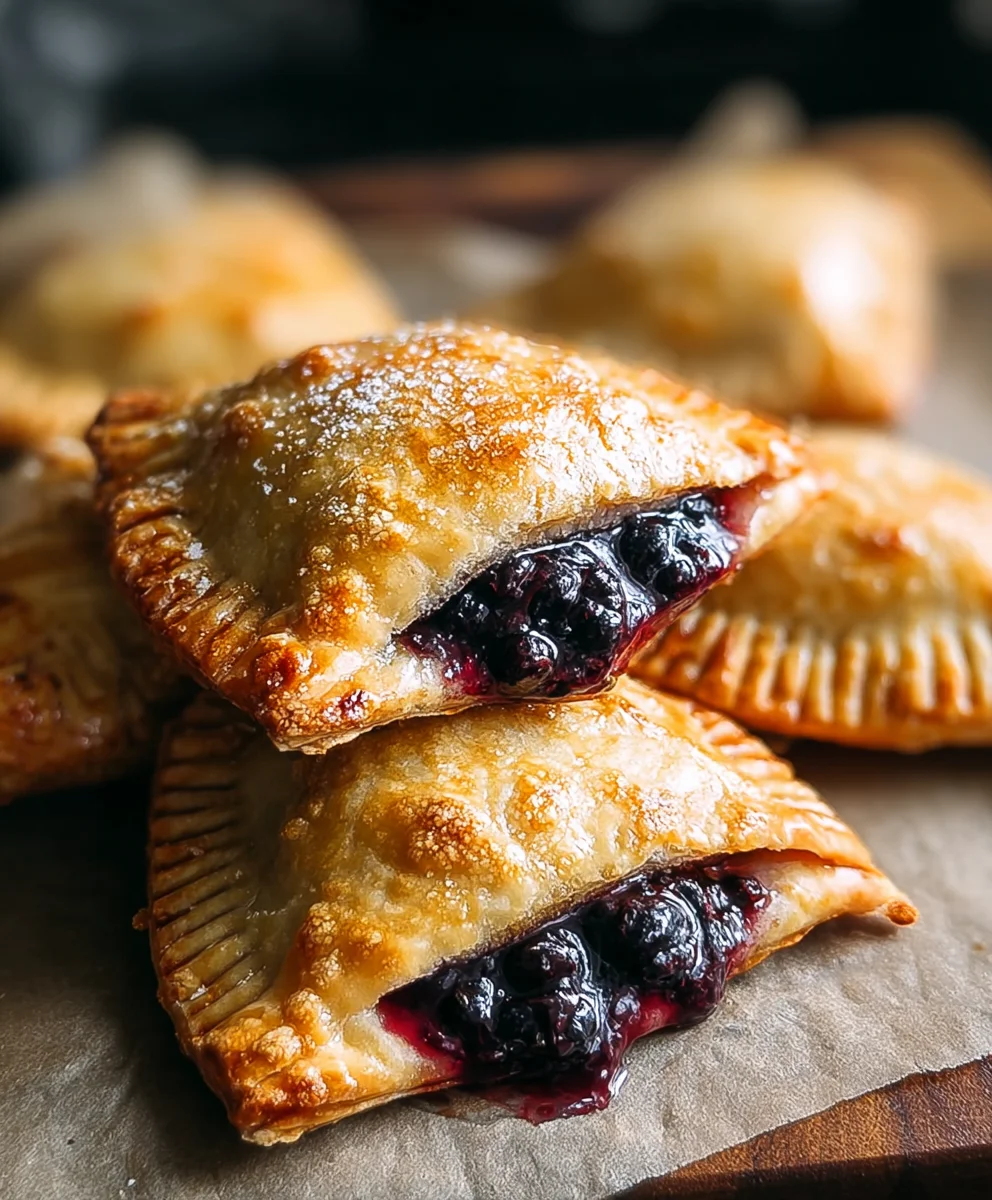
Blackberry Hand Pies-Sweet & Easy Dessert Recipes
Blackberry Hand Pies are more than just a sweet treat; they’re a portable slice of pure joy. Imagin extracte flaky, golden pastry encasing a warm, bubbling filling bursting with the sweet-tart intensity of ripe blackberries. It’s no wonder these little treasures are so beloved! They evoke nostalgic memories of summer picnics and grandmother’s kitchen, offering a comforting embrace with every bite. What truly sets these Blackberry Hand Pies apart is their perfect balance: the richness of the buttery crust against the vibrant, slightly zesty berry filling. They’re incredibly versatile, making them an ideal dessert for a casual gathering, a delightful afternoon pick-me-up, or even a whimsical breakfast. Get ready to fall in love with these delightful handheld wonders; they are surprisingly simple to create and absolutely irresistible to devour.
Ingredients:
- 21 oz. can blackberry pie filling
- 1 package refrigerated pie crust (usually 2 crusts)
- 1/2 cup powdered sugar
- 1 teaspoon corn syrup
- 1 tablespoon water
- Vegetable oil for frying (enough for about 1-2 inches in your pan)
Preparing the Hand Pies
Step 1: Assembling the Hand Pie Bases
The first step in creating these delightful blackberry hand pies is to prepare the individual pie shells. Unroll your refrigerated pie crusts carefully onto a clean, lightly floured surface. It’s important to handle them gently to prevent tearing. Using a round cookie cutter or a small bowl with a rim (around 4-5 inches in diameter works well for a good handheld size), cut out as many circles as you can from each crust. You should aim to get about 3-4 circles per crust, depending on the size of your cutter. Once you have your circles, place half of them on a baking sheet lined with parchment paper. These will be the bottoms of your hand pies. Keep the remaining circles on a separate sheet of parchment paper, as they will form the tops. This initial step ensures you have all your bases and tops ready before moving on to the filling.
Step 2: Filling the Hand Pies
Now it’s time to add the star of the show: the blackberry pie filling. You want to spoon a generous amount of the blackberry pie filling onto the center of each of the pie crust circles that are on the baking sheet. Be careful not to overfill, as this can make sealing the pies more difficult and can cause the filling to bubble out during frying. A good rule of thumb is to leave about a 1/2 inch border around the edge of the crust free from filling. This border will be crucial for sealing the pies effectively. Think of it like creating a small well of delicious blackberry goodness in the middle of each pastry circle.
Step 3: Sealing and Crimping the Edges
This is a key step to ensure your blackberry hand pies hold together beautifully during the frying process. Take the remaining pie crust circles and gently lay them over the filled bottom crusts. Carefully align the edges. Now, using your fingers, press down around the entire perimeter of each hand pie to seal the top and bottom crusts together. Once senon-alcoholic aled, you can use the tines of a fork to create a decorative and secure crimped edge. Press the fork gently around the entire circumference of each pie. This not only looks attractive but also ensures that the filling stays safely inside. As an extra precaution against leaks, you can also lightly moisten the edge with a tiny bit of water before crimping.
Step 4: Venting the Pies and Preparing for Frying
Before we even think about the hot oil, it’s essential to create vents in the top of your hand pies. This allows steam to escape during the frying process, preventing the pies from bursting. Using a small sharp knife, carefully cut 1-2 small slits in the top of each hand pie. You can make them simple lines, or get creative with small shapes. Once vented, place the baking sheet with your prepared hand pies into the refrigerator for at least 15-20 minutes. Chilling the pies helps the pastry firm up, which results in a crispier crust and helps them maintain their shape better when they hit the hot oil. While the pies are chilling, you can begin extract to prepare your frying station.
Frying and Finishing
Step 5: Frying the Blackberry Hand Pies
Heat about 1-2 inches of vegetable oil in a heavy-bottomed skillet or Dutch oven over medium heat. You’re looking for a temperature of around 350°F (175°C). If you don’t have a thermometer, you can test the oil by dropping a tiny piece of pie crust into it. If it sizzles and floats to the surface right away, your oil is ready. Carefully, and in batches to avoid crowding the pan, place 2-3 hand pies into the hot oil. Fry them for about 2-3 minutes per side, or until they are a beautiful golden brown. Use a slotted spoon or spider strainer to gently turn them over to ensure even cooking. Once they are golden on both sides, remove them from the oil and place them on a wire rack set over a baking sheet to drain any excess oil. This cooling rack setup is important for maintaining crispiness.
Step 6: Glazing and Enjoying
While the fried blackberry hand pies are still warm, it’s time to add a touch of sweetness and shine with the glaze. In a small bowl, whisk together the powdered sugar, corn syrup, and water until you have a smooth, drizzle-able glaze. The corn syrup adds a nice sheen and prevents the glaze from becoming too hard. Using a spoon, generously drizzle this glaze over the warm hand pies. The warmth of the pies will help the glaze set slightly. Allow the glaze to set for a few minutes before serving. These blackberry hand pies are best enjoyed warm, when the crust is still wonderfully crisp and the blackberry filling is gooey and delicious. You can serve them as a delightful dessert or even a sweet breakfast treat.
Conclusion:
We hope you’ve enjoyed diving into the delightful world of Blackberry Hand Pies! These individual, portable treats are a perfect balance of sweet and tart, encased in a flaky, buttery pastry. They’re wonderful for any occasion, from a simple afternoon snack to a charming addition to a picnic or potluck. Don’t be afraid to get creative with your fillings; the possibilities are endless!
For serving, a dusting of powdered sugar or a dollop of fresh whipped cream truly elevates the experience. You can also serve them warm with a scoop of vanilla ice cream for an irresistible dessert. If you’re feeling adventurous with variations, consider adding a pinch of cinnamon or nutmeg to the filling for a warmer spice note, or swap out half of the blackberries for raspberries or blueberries. Perhaps even a hint of lemon zest in the pastry itself would be a delightful twist.
Ultimately, the best part about making Blackberry Hand Pies is the joy they bring. So gather your ingredients, embrace the process, and savor every bite of these homemade treasures. We encourage you to experiment and make them your own!
Frequently Asked Questions about Blackberry Hand Pies:
Can I make the dough ahead of time?
Absolutely! The pastry dough for your Blackberry Hand Pies can be made up to two days in advance and stored, well-wrapped, in the refrigerator. You can even freeze the dough for up to a month; just be sure to let it thaw completely in the refrigerator before rolling it out.
What if I don’t have fresh blackberries?
No problem at all! Frozen blackberries work wonderfully in this recipe. You might need to cook them down slightly longer to release their juices and thicken the filling. Just ensure they are fully thawed before incorporating them into your hand pie mixture.
Blackberry Hand Pies
Sweet and easy blackberry hand pies, perfect for a delightful dessert or sweet breakfast treat.
Ingredients
-
21 oz. can blackberry pie filling
-
1 package refrigerated pie crust
-
1/2 cup powdered sugar
-
1 teaspoon corn syrup
-
1 tablespoon water
-
Vegetable oil for frying
Instructions
-
Step 1
Unroll pie crusts onto a floured surface. Cut out 4-5 inch circles. Place half of the circles on a parchment-lined baking sheet for the bottoms. -
Step 2
Spoon a generous amount of blackberry pie filling onto the center of each bottom crust circle, leaving a 1/2 inch border. -
Step 3
Place the remaining pie crust circles over the filled bottoms. Press edges to seal, then crimp with a fork for a decorative and secure edge. -
Step 4
Cut 1-2 small slits in the top of each hand pie for venting. Refrigerate for at least 15-20 minutes to firm up the pastry. -
Step 5
Heat 1-2 inches of vegetable oil to 350°F (175°C) in a skillet. Fry 2-3 pies at a time for 2-3 minutes per side until golden brown. Drain on a wire rack. -
Step 6
Whisk together powdered sugar, corn syrup, and water to make a glaze. Drizzle generously over warm hand pies and let set before serving.
Important Information
Nutrition Facts (Per Serving)
It is important to consider this information as approximate and not to use it as definitive health advice.
Allergy Information
Please check ingredients for potential allergens and consult a health professional if in doubt.