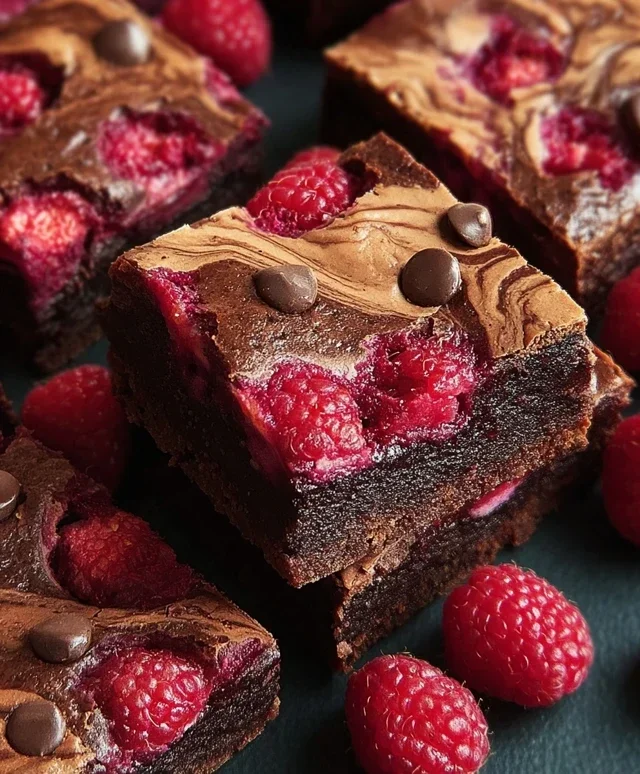
Raspberry Swirl Brownies-Irresistible Chocolate Treat
Raspberry swirl brownies are more than just a dessert; they are a symphony of rich, decadent chocolate and bright, tangy fruit, all swirled together in perfect harmony. If you’ve ever found yourself craving a treat that’s both intensely chocolatey and refreshingly vibrant, then these raspberry swirl brownies are about to become your new obsession. There’s something inherently magical about that beautiful, marbled appearance, promising a burst of fruity sweetness with every fudgy bite. It’s this delightful contrast that makes raspberry swirl brownies so incredibly appealing – the deep, dark chocolate grounds the experience, while the jewel-toned raspberry ribbons cut through the richness, leaving you utterly satisfied and wanting more. They’re the perfect showstopper for any gathering, yet surprisingly simple to create in your own kitchen, proving that extraordinary desserts don’t always require a culinary degree. Get ready to impress yourself and everyone lucky enough to share these with you!
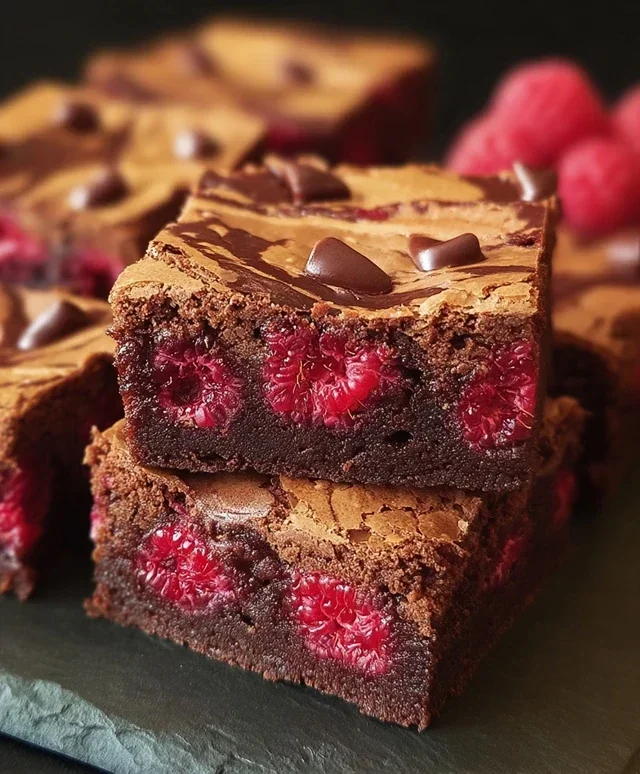
Raspberry Swirl Brownies
Get ready to experience brownie bliss with a vibrant, fruity twist! These Raspberry Swirl Brownies are the perfect marriage of rich, fudgy chocolate and bright, tangy raspberries. The swirls of raspberry jam create beautiful patterns and a delightful burst of flavor that cuts through the deep chocolate intensity. They’re surprisingly easy to make and guaranteed to impress, whether you’re a seasoned baker or just starting out. The process is straightforward, and the results are undeniably delicious. Let’s dive in and create some chocolatey magic!
Ingredients:
Crafting the Fudgy Brownie Base
The foundation of our incredible brownies starts with melting the butter. This can be done gently in a saucepan over low heat or in the microwave in 30-second intervals, stirring in between, until fully liquid. In a large mixing bowl, combine the melted butter with 1 ¼ cups of granulated sugar. Whisk these together until the mixture is smooth and well combined. Next, it’s time to incorporate the cocoa powder and salt. Sift the cocoa powder if you want to ensure no lumps, which will give you an even smoother batter. Gradually whisk in the cocoa powder and salt until the mixture is homogenous and has a deep, chocolatey aroma.
Now, let’s add the vanilla extract for that classic brownie fragrance and flavor. Stir it in until it’s fully incorporated. The richness of the vanilla complements the chocolate beautifully. Following that, we’ll add the eggs, one at a time. It’s important to add them one at a time and whisk well after each addition. This helps to emulsify the batter and create that desirable fudgy texture. Make sure the eggs are at room temperature; this helps them to incorporate more easily into the batter, leading to a smoother consistency. Don’t overmix at this stage; just ensure each egg is fully blended in.
Once the eggs are incorporated, it’s time for the flour. Gently fold in the all-purpose flour using a spatula or wooden spoon. Be careful not to overmix; we want to develop the gluten in the flour as little as possible to keep the brownies tender and fudgy, not tough. Stop mixing as soon as you no longer see streaks of dry flour. Finally, fold in the chocolate chips. These will melt slightly during baking, adding extra pockets of gooey chocolate throughout your brownies. The batter will be thick and luscious at this point.
Preparing the Vibrant Raspberry Swirl
While our brownie batter is ready, we need to prepare the star of our swirl: the raspberries! In a separate small bowl, combine the fresh raspberries with the remaining 2 tablespoons of granulated sugar and the teaspoon of lemon juice. Gently mash the raspberries with a fork. You don’t want to completely purée them; a little texture from the mashed berries is lovely, and the seeds can add a delightful crunch. The lemon juice will brighten the raspberry flavor and also help them to break down slightly, creating a slightly jammy consistency that will swirl beautifully into the brownie batter. If you prefer a smoother swirl, you can briefly pulse this mixture in a food processor, but be careful not to turn it into a liquid.
Assembling and Swirling for Perfection
Preheat your oven to 350°F (175°C) and grease and flour an 8×8 inch baking pan, or line it with parchment paper, leaving an overhang on the sides. This will make it much easier to lift the brownies out of the pan once they’re baked. Pour about two-thirds of the brownie batter into the prepared pan, spreading it evenly with your spatula. Now, spoon dollops of the mashed raspberry mixture over the brownie batter. Don’t be shy; spread them out to cover most of the surface.
Next, carefully spoon the remaining brownie batter over the raspberry dollops. Use your spatula to gently spread this top layer of batter, trying to cover as much of the raspberry mixture as possible without mixing it in too much. The goal is to have pockets of raspberry peeking through. Now comes the fun part: creating the swirl! Take a knife or a skewer and gently swirl the raspberry mixture into the brownie batter. Make figure-eight motions or simple up-and-down movements. Don’t over-swirl, or you’ll end up with a uniform pinkish-brown color instead of distinct swirls. Aim for beautiful, marbled patterns.
Baking and Cooling to Ultimate Indulgence
Place the pan in the preheated oven. Bake for 30-35 minutes, or until a toothpick inserted into the center of the brownies comes out with moist crum extractbs attached, but not wet batter. It’s crucial not to overbake them, as this will result in dry brownies. The raspberry swirl might still look slightly wet, but that’s okay. Once baked, remove the pan from the oven and let the brownies cool completely in the pan on a wire rack. This cooling period is essential for the brownies to set properly and for the fudgy texture to develop. Rushing this step can lead to crum extractbly, soft brownies that are difficult to cut. Once completely cool, use the parchment paper overhang to lift the entire block of brownies out of the pan. Cut them into squares and enjoy the delightful interplay of rich chocolate and bright raspberry!
Conclusion:
There you have it – a recipe for Raspberry Swirl Brownies that’s sure to become a new favorite! These brownies are a delightful blend of rich, fudgy chocolate and bright, tangy raspberry. The visual appeal of the vibrant swirl is matched only by the incredible taste and texture. They’re wonderfully fudgy with a perfect chew, and the burst of fruit cuts through the sweetness beautifully. I truly believe these are a crowd-pleaser for any occasion, from casual weeknight treats to more special gatherings.
For serving suggestions, I love enjoying these brownies warm, perhaps with a scoop of vanilla bean ice cream or a dollop of fresh whipped cream. They’re also delicious at room temperature, making them perfect for picnics or potlucks. If you’re looking for variations, consider adding a touch of lemon zest to the raspberry swirl for an extra zing, or folding in some white chocolate chips into the brownie batter for added texture and sweetness. Don’t hesitate to experiment and make these Raspberry Swirl Brownies your own!
Frequently Asked Questions:
Can I use frozen raspberries instead of fresh?
Absolutely! If using frozen raspberries, be sure to thaw them completely and drain off any excess liquid before swirling them into the brownie batter. This will prevent the brownies from becoming too moist.
How do I get a good swirl pattern?
The key is to dollop the raspberry mixture over the brownie batter and then gently swirl it with a toothpick or knife. Don’t overmix, or the colors will blend too much. Aim for distinct ribbons of raspberry throughout the chocolate base.
How long will these brownies keep?
Stored in an airtight container at room temperature, these Raspberry Swirl Brownies will stay fresh for about 3-4 days. You can also refrigerate them for a slightly longer shelf life, though they might become a bit firmer.
Raspberry Swirl Brownies
Decadent chocolate brownies with a vibrant swirl of fresh raspberry sauce.
Ingredients
-
1 cup unsalted butter
-
1 ¼ cups granulated sugar
-
¾ cup cocoa powder
-
½ tsp salt
-
2 tsp vanilla extract
-
3 large eggs
-
1 cup all-purpose flour
-
1 cup chocolate chips
-
1 cup fresh raspberries
-
2 tbsp granulated sugar
-
1 tsp lemon juice
Instructions
-
Step 1
Preheat oven to 350°F (175°C). Grease and flour a 9×13 inch baking pan. -
Step 2
In a large bowl, melt the butter. Stir in 1 ¼ cups granulated sugar, cocoa powder, and salt until well combined. -
Step 3
Beat in the vanilla extract and eggs one at a time until smooth. -
Step 4
Gently fold in the flour and chocolate chips until just combined. Do not overmix. -
Step 5
In a small saucepan, combine fresh raspberries, 2 tbsp granulated sugar, and lemon juice. Cook over medium heat, stirring occasionally, until raspberries break down and sauce thickens slightly, about 5-7 minutes. Strain if desired to remove seeds. -
Step 6
Pour half of the brownie batter into the prepared pan. Dollop half of the raspberry sauce over the batter. Swirl gently with a knife. -
Step 7
Spread the remaining brownie batter over the raspberry layer. Dollop the remaining raspberry sauce on top and swirl again. -
Step 8
Bake for 30-35 minutes, or until a toothpick inserted into the center comes out with moist crumbs attached. -
Step 9
Let cool completely in the pan before cutting into squares.
Important Information
Nutrition Facts (Per Serving)
It is important to consider this information as approximate and not to use it as definitive health advice.
Allergy Information
Please check ingredients for potential allergens and consult a health professional if in doubt.