Tri Tip Two Ways- Juicy & Delicious Grilled Recipes
Tri Tip (2 Ways): a culinary cbeef hameleon that truly shines. If you’ve ever enjoyed that perfectly grilled, succulent piece of beef, chances are you’ve fallen for the irresistible charm of tri tip. This uniquely triangular cut, also known as the bottom sirloin, boasts a fantastic balance of tenderness and rich, beefy flavor that makes it a barbecue favorite. What truly sets tri tip apart is its incredible versatility. It’s forgiving enough for backyard grilling novices while still offering a canvas for seasoned chefs to explore exciting flavor profiles. We’re diving into not just one, but two incredible ways to prepare this magnificent cut, proving that tri tip is more than just a steak; it’s an experience waiting to happen. Get ready to elevate your dinner game with this fantastic tri tip adventure!

Tri Tip (2 Ways): The Versatile Cut That Shines
The tri tip roast, also known as the bottom sirloin roast, is a fantastic cut of beef that’s gaining popularity for its incredible flavor and tenderness. It’s lean, surprisingly affordable, and incredibly versatile, making it a go-to for weeknight dinners and impressive gatherings alike. What’s even better is its adaptability to different cooking methods. Today, I’m going to show you two of my favorite ways to prepare a tri tip: a classic pan-sear followed by a low-and-slow oven finish for that perfect, juicy interior, and a quick, flavorful grilling method that delivers a fantastic crust. Whichever method you choose, the result is a delicious, crowd-pleasing roast.
Ingredients:
Method 1: Pan-Sear & Oven Finish
This method is my go-to when I want a beautifully browned exterior and a perfectly medium-rare center, without having to stand over the grill. It’s a fantastic way to control the cooking process and ensure consistent results, even for begin extractners.
Step 1: Prepare the Roast
First things first, let’s get our tri tip ready. Pat the roast completely dry with paper towels. This is a crucial step for achieving a beautiful sear. Moisture on the surface of the meat will steam rather than sear, and we want that delicious, caramelized crust. In a small bowl, combine the garlic salt, Lawry’s seasoning salt, kosher salt, black pepper, sugar, garlic powder, and parsley. This blend creates a flavorful rub that will penetrate the meat and enhance its natural beefiness. Evenly sprinkle this rub all over the tri tip, making sure to get all sides. Gently press the rub into the meat.
Step 2: Achieve the Perfect Sear
Now, let’s get that beautiful crust. Heat the olive oil in a large, oven-safe skillet (cast iron is ideal here) over medium-high heat until it’s shimmering but not smoking. Carefully place the seasoned tri tip into the hot skillet, fat-side down if there’s a discernible fat cap. Sear for about 3-4 minutes per side, until a deep golden-brown crust forms. You’ll hear that satisfying sizzle – that’s the sound of flavor developing! Use tongs to turn the roast and sear all sides, including the edges, for about 1-2 minutes each. This initial sear locks in the juices and builds a foundation of flavor.
Step 3: Low and Slow in the Oven
Once the tri tip is beautifully seared on all sides, transfer the entire skillet (if oven-safe) or the seared roast to a baking sheet into a preheated oven at 300°F (150°C). We’re going to finish cooking it low and slow. The exact cooking time will depend on your desired level of doneness, but a good starting point is about 30-45 minutes for medium-rare. Use a meat thermometer to check the internal temperature. For medium-rare, aim for 130-135°F (54-57°C). For medium, go for 135-140°F (57-60°C). It’s always better to pull it a few degrees early, as the temperature will continue to rise as it rests.
Step 4: Rest is Best
This is arguably the most important step for a tender and juicy roast, and it’s often overlooked! Once the tri tip reaches your desired internal temperature, remove it from the oven and transfer it to a clean cutting board. Tent it loosely with aluminum foil and let it rest for at least 10-15 minutes. This resting period allows the juices to redistribute throughout the meat. If you cut into it too soon, all those delicious juices will run out onto the cutting board, leaving you with a dry roast. Be patient – the wait is worth it!
Step 5: Slice and Serve
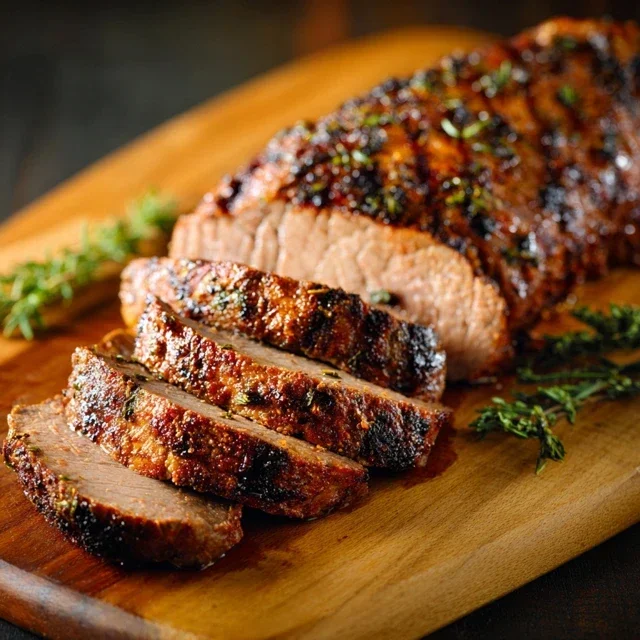
After resting, slice the tri tip against the grain. You’ll notice a distinct grain running through the roast. Slicing perpendicular to this grain is key to maximum tenderness. The thinner you slice it, the more tender it will feel. Serve immediately and enjoy the fruits of your labor!
Method 2: Grilling for a Smoky Kick
If you love the smoky flavor that only grilling can provide, this method is for you. It’s a bit more hands-on but delivers fantastic results, especially on a nice day.
Step 1: Prepare and Season
Follow Step 1 from the pan-sear method to prepare and season your tri tip. Ensure it’s patted dry and thoroughly rubbed with your spice blend.
Step 2: Set up Your Grill
Preheat your grill to medium-high heat (around 400-450°F or 200-230°C). For a gas grill, this means turning on two burners to high and one to low (or all to medium if you only have two). For a charcoal grill, bank the coals to one side, creating a direct heat zone and an indirect heat zone.
Step 3: Sear Over Direct Heat
Place the seasoned tri tip over the direct heat zone of your grill. Sear for about 3-4 minutes per side, just like in the pan-sear method, until a beautiful crust forms. You want to achieve that same deep brown color.
Step 4: Finish Over Indirect Heat
Once seared, move the tri tip to the indirect heat zone of your grill. Close the lid and let it cook until it reaches your desired internal temperature, similar to the oven method. For medium-rare, aim for 130-135°F (54-57°C). This will likely take another 20-30 minutes, depending on your grill’s temperature and the thickness of the roast. Keep an eye on the temperature with your meat thermometer.
Step 5: Rest and Slice
Once again, this is a critical step. Remove the tri tip from the grill and let it rest, tented with foil, for 10-15 minutes. Then, slice against the grain for maximum tenderness and serve.
Both of these methods showcase the incredible flavor and texture of the tri tip. Whether you prefer the controlled environment of your oven or the smoky char of the grill, you’re in for a treat. Enjoy!
Conclusion:
I hope you’ve enjoyed exploring these two delicious ways to prepare Tri Tip! This versatile cut of beef truly shines, offering a fantastic balance of flavor and tenderness without breaking the bank. Whether you’re craving the smoky char of the grill or the savory depth of oven roasting, both methods deliver an incredibly satisfying meal. I find the adaptability of tri tip to be one of its greatest strengths.
For serving, I love pairing the grilled tri tip with classic barbecue sides like potato salad, coleslaw, or grilled corn on the cob. The oven-roasted version is fantastic sliced thin for sandwiches, piled high on a salad, or served with roasted root vegetables and a rich pan sauce. Don’t be afraid to experiment with marinades or rubs; a simple garlic-herb blend or a spicy chili rub can elevate your tri tip experience even further. I wholeheartedly encourage you to give these tri tip recipes a try – you won’t be disappointed!
Frequently Asked Questions:
What’s the best way to slice Tri Tip?
For maximum tenderness, it’s crucial to slice your tri tip against the grain. Look for the direction of the muscle fibers and cut perpendicular to them. Slicing thinly will make a huge difference in the texture of your finished dish.
Can I marinate Tri Tip ahead of time?
Absolutely! Marinating tri tip for at least 4 hours, or even overnight in the refrigerator, will infuse it with incredible flavor and help tenderize the meat even further. Just be sure to remove it from the marinade and pat it dry before cooking.
What if I don’t have a grill?
No problem at all! The oven-roasted method is a fantastic alternative and delivers equally delicious results. You can even achieve a nice sear by starting it in a hot oven-safe skillet before transferring it to bake.
Tri Tip (2 Ways)
A versatile tri tip roast prepared with two distinct flavor profiles, offering a delicious and adaptable meal.
Ingredients
-
2 & 1/2 pound tri tip roast
-
1 & 1/2 teaspoons garlic salt
-
1 tablespoon Lawry’s seasoning salt
-
1 & 1/2 teaspoons kosher salt (Diamond Crystal)
-
1 teaspoon black pepper
-
1/2 teaspoon sugar
-
2 teaspoons garlic powder
-
1 tablespoon dried or fresh parsley
-
1/4 cup olive oil
Instructions
-
Step 1
Preheat your oven to 400°F (200°C) or prepare your grill for indirect heat. -
Step 2
In a small bowl, combine the garlic salt, Lawry’s seasoning salt, kosher salt, black pepper, sugar, garlic powder, and parsley. Mix well. -
Step 3
Rub the tri tip roast all over with the olive oil, then generously coat it with the prepared seasoning mixture. Allow to sit at room temperature for 15-30 minutes. -
Step 4
For the first way: Sear the tri tip on all sides over high heat on the grill or in a hot oven-safe skillet on the stovetop. Then, transfer to a baking sheet and roast in the preheated oven for approximately 45-60 minutes, or until the internal temperature reaches your desired doneness (130-135°F for medium-rare). -
Step 5
For the second way (grilling): Place the seasoned tri tip on the indirect heat side of the grill. Close the lid and cook for approximately 45-60 minutes, flipping halfway through, until the internal temperature reaches your desired doneness (130-135°F for medium-rare). -
Step 6
Once cooked, remove the tri tip from the heat and let it rest for at least 10-15 minutes before slicing against the grain.
Important Information
Nutrition Facts (Per Serving)
It is important to consider this information as approximate and not to use it as definitive health advice.
Allergy Information
Please check ingredients for potential allergens and consult a health professional if in doubt.