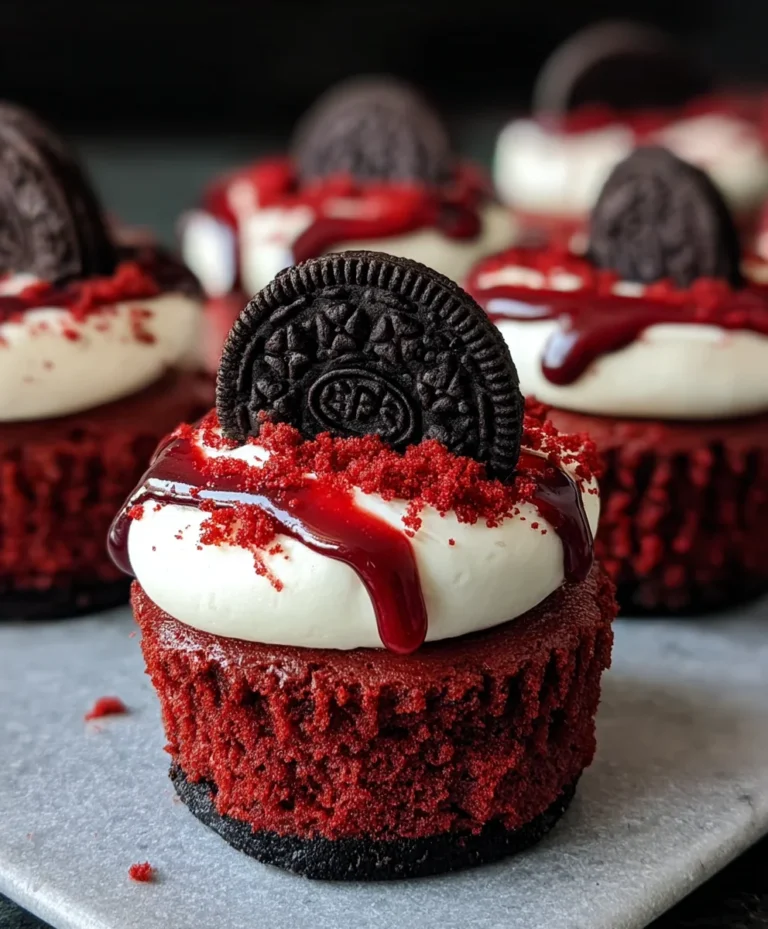
Black Forest Cheesecake-Rich Decadent Dessert
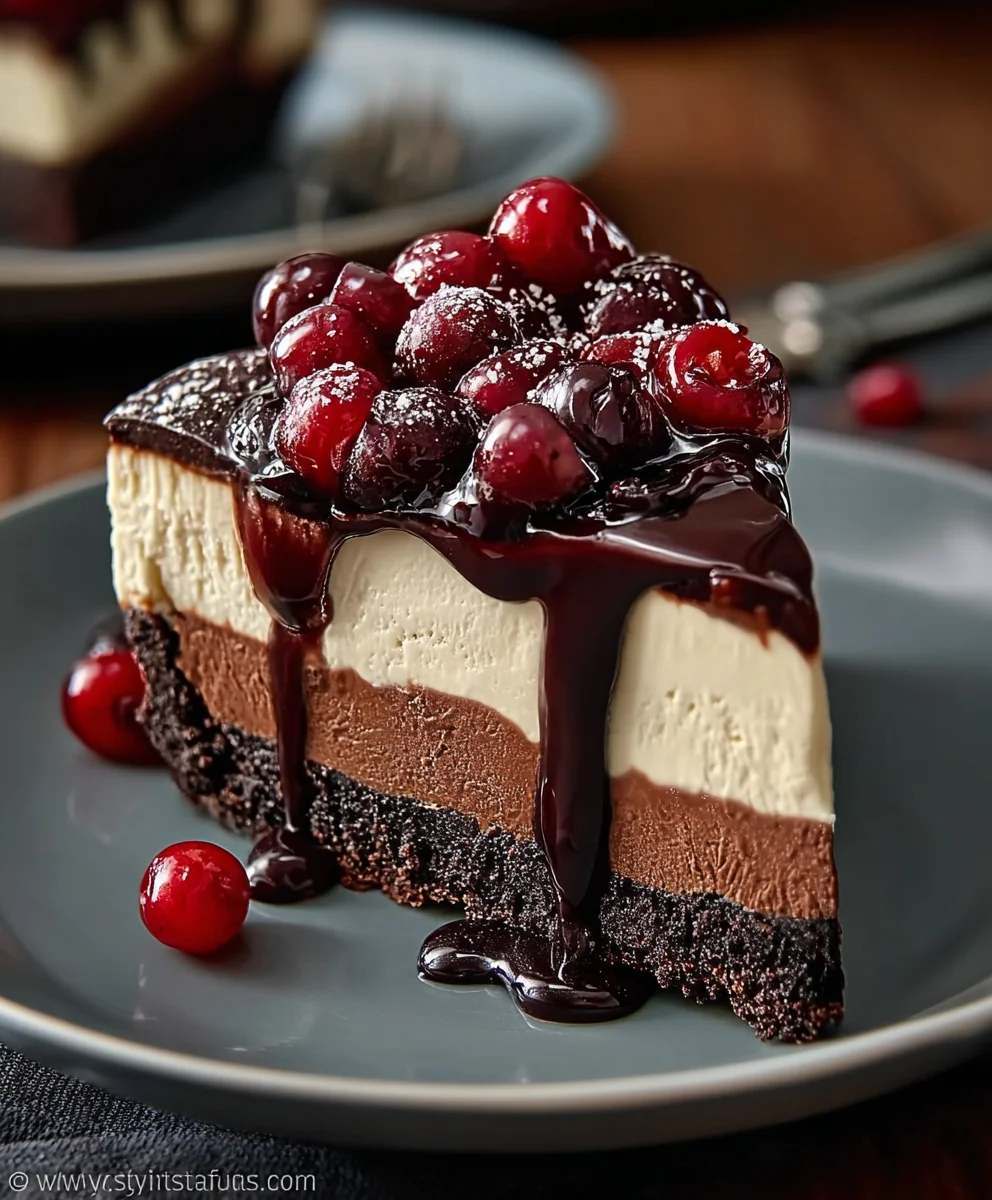
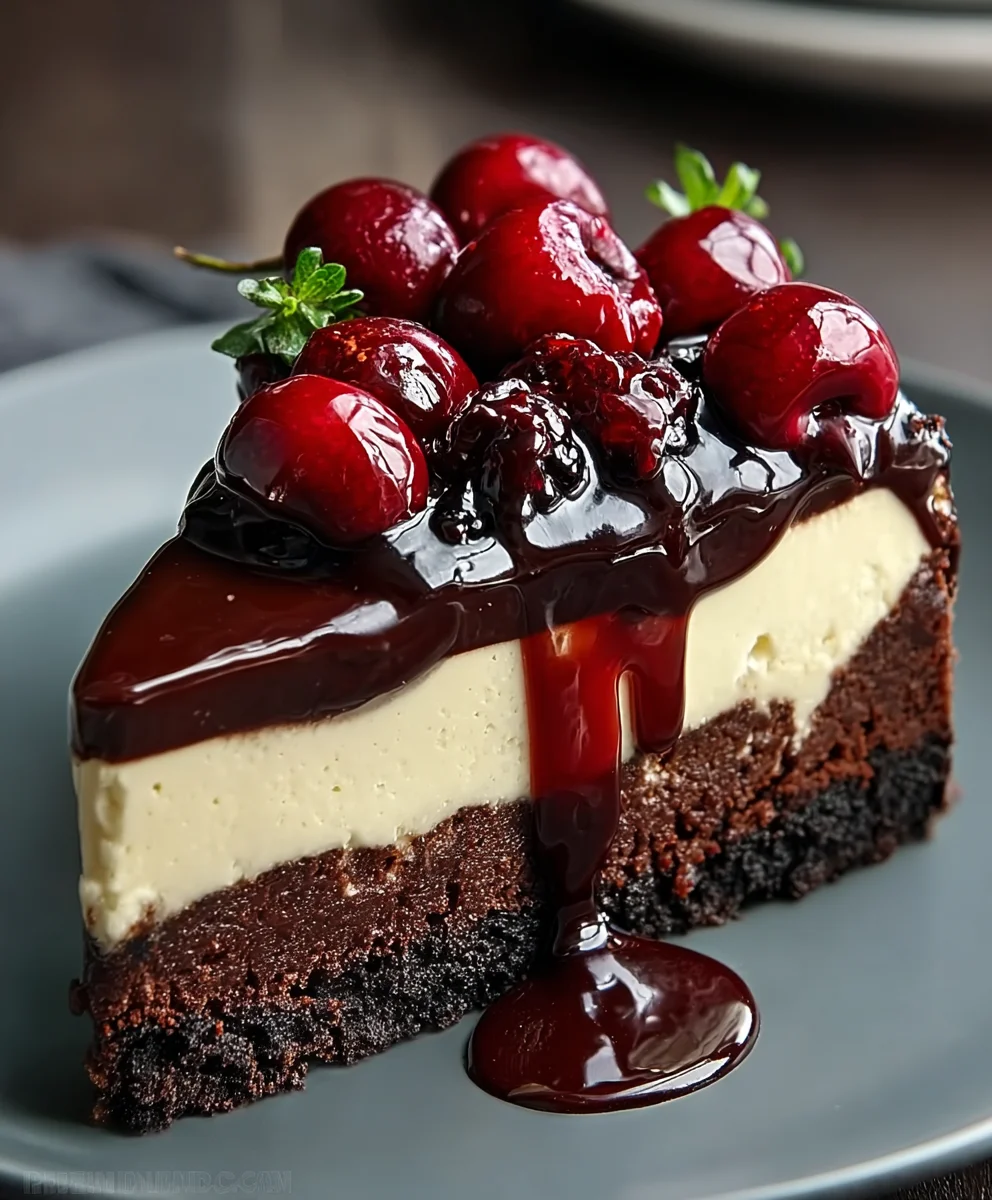
Black Forest Cheesecake Delight is more than just a dessert; it’s an experience. Imagin extracte the rich, velvety embrace of a classic cheesecake, but with a decadent twist that transports you straight to the heart of a German forest. This isn’t your average cheesecake. What truly sets this Black Forest Cheesecake Delight apart is the harmonious marriage of textures and flavors: a sturdy, chocolate cookie crust cradles a luxuriously smooth, creamy cheesecake filling, all crowned with a generous cascade of Kirsch Extract-infused whipped cream and glossy, dark cherries. It’s the kind of showstopper that elicits gasps of delight at every gathering, a symphony of chocolate, cherry, and cream that will have everyone asking for seconds. We’ve perfected this recipe to capture that magical balance, ensuring every bite is an unforgettable journey.
Ingredients:
- 1 ½ cups crushed chocolate cookies
- ¼ cup melted butter
- 3 (8 oz) packages cream cheese, softened
- 1 cup sugar
- 1 teaspoon vanilla extract
- 3 large eggs
- ½ cup sour cream
- ¼ cup unsweetened cocoa powder
- 1 can cherry pie filling
- Whipped cream, for garnish
- Chocolate shavings, for garnish
Preparing the Crust
Step 1: Crafting the Chocolate Cookie Base
Begin extract by preparing the foundation for our magnificent Black Forest Cheesecake Delight. Take your 1 ½ cups of crushed chocolate cookies and place them into a medium-sized bowl. If you’re crushing them yourself, a food processor is your best friend for achieving a fine, sand-like consistency. If you don’t have one, you can also place the cookies in a sturdy zip-top bag and use a rolling pin to break them down. Once your cookies are finely crushed, add the ¼ cup of melted butter to the bowl. Stir this mixture thoroughly until all the cookie crum extractbs are evenly moistened with the butter. This is crucial for creating a crust that holds together well and drum extractn’t crumble when you slice into the cheesecake.
Step 2: Pressing the Crust into the Pan
Now, take a 9-inch springform pan. This type of pan is ideal for cheesecakes because its sides can be easily removed, allowing for a beautiful presentation. Spoon the chocolate cookie and butter mixture into the bottom of the prepared springform pan. Using the bottom of a glass or a flat-bottomed measuring cup, firum extracty press the crumbs evenly across the base of the pan. Ensure you push them right up to the edges to create a cohesive layer. A well-compacted crust will prevent the cheesecake filling from leaking and provide a satisfying textural contrast. For an even sturdier crust, you can optionally bake it in a preheated 350°F (175°C) oven for about 8-10 minutes, then let it cool completely before adding the filling.
Creating the Cheesecake Filling
Step 3: The Cream Cheese and Sugar Symphony
In a large mixing bowl, combine the 3 (8 oz) packages of softened cream cheese with the 1 cup of sugar. It’s essential that your cream cheese is truly softened to room temperature. This ensures that it will cream smoothly with the sugar, preventing lumps in your cheesegin extracte. Begin beating the cream cheese and sugar together on medium speed with an electric mixer until the mixture is light, fluffy, and completely smooth. Scrape down the sides and bottom of the bowl frequently to make sure everything is incorporated evenly. Next, beat in the 1 teaspoon of vanilla extract, which will lend its wonderful aroma and flavor to the entire cheesecake.
Step 4: Incorporating Eggs and Flavor Enhancers
With the cream cheese mixture still in the bowl, add the 3 large eggs, one at a time. Beat each egg into the mixture just until it’s incorporated before adding the next. Overmixing after the eggs are added can introduce too much air, which can cause the cheesecake to crack during baking. After the eggs are blended in, add the ½ cup of sour cream. The sour cream contributes to the creamy texture and adds a subtle tang that balances the sweetness. Beat on low speed until just combined. Finally, sift in the ¼ cup of unsweetened cocoa powder. Sifting the cocoa powder prevents lumps from forming in your batter. Mix on low speed until the cocoa powder is fully incorporated and the batter takes on a beautiful, uniform chocolate hue. Be careful not to overmix at this stage; we want a smooth, rich chocolate cheesecake filling.
Baking and Finishing Touches
Step 5: Baking the Black Forest Masterpiece
Pour the luscious chocolate cheesecake filling evenly over the prepared chocolate cookie crust in the springform pan. Smooth the top with a spatula. For a truly professional result and to minimize the risk of cracking, consider using a water bath for baking. To do this, wrap the bottom of your springform pan securely in heavy-duty aluminum foil to prevent any water from seeping in. Place the foil-wrapped pan inside a larger baking pan. Carefully pour hot water into the larger pan until it comes about halfway up the sides of the springform pan. Place the entire setup into a preheated oven at 325°F (160°C). Bake for approximately 50-65 minutes, or until the edges of the cheesecake are set but the center still has a slight jiggle when gently shaken.
Step 6: Chilling and Garnishing for Perfection
Once the cheesecake is baked, turn off the oven, crack the oven door open slightly, and let the cheesecake cool in the oven for about 1 hour. This gradual cooling process helps prevent cracking. After it has cooled in the oven, remove it from the water bath (if used) and let it cool completely on a wire rack at room temperature. Once cooled, cover the cheesecake loosely with plastic wrap and refrigerate for at least 6 hours, or preferably overnight, to allow it to firm up properly. Before serving your exquisite Black Forest Cheesecake Delight, carefully run a knife around the edge of the pan to loosen it, then release the springform ring. Spoon the 1 can of cherry pie filling generously over the top of the chilled cheesecake, allowing some of it to cascade down the sides. Finally, adorn your creation with generous dollops of whipped cream and a scattering of delicate chocolate shavings. The contrast of the rich chocolate, tangy cherries, and creamy filling is simply divine.
Conclusion:
We’ve reached the end of our journey to creating the truly exquisite Black Forest Cheesecake Delight! This rich and decadent dessert perfectly balances the classic flavors of chocolate, cherries, and cream, all nestled atop a wonderfully tender cheesecake base. I hope you’ve enjoyed the process of bringin extractg this treat to life in your own kitchen. It’s a showstopper for any special occasion, or simply a delightful indulgence for a cozy evening in. Don’t hesitate to get creative with the toppings – a dusting of extra chocolate shavings or a few fresh cherries can elevate its visual appeal even further. Remember, the joy of baking is in the making and sharing, so gather your loved ones and savor every bite of this Black Forest Cheesecake Delight.
Frequently Asked Questions:
Can I make the Black Forest Cheesecake Delight ahead of time?
Absolutely! The Black Forest Cheesecake Delight is an excellent make-ahead dessert. In fact, it often tastes even better after chilling overnight, allowing the flavors to meld beautifully. Ensure it’s well-covered in the refrigerator to prevent any odors from being absorbed. It can typically be made 1-2 days in advance.
What are some good variations for the Black Forest Cheesecake Delight?
For a twist, you could try using a different type of cookie for the crust, such as Oreos for an extra chocolatey base. You could also experiment with adding a layer of chocolate ganache on top before the whipped cream, or even infusing the whipped cream with a hint of kirsch extract liqueur extract for a more authentic Black Forest cake flavor profile. For a dairy-free version, explore vegan cream cheese and plant-based whipped cream alternatives.
Black Forest Cheesecake – Rich Decadent Dessert
A rich and decadent Black Forest Cheesecake featuring a chocolate cookie crust, creamy chocolate cheesecake filling, and a topping of cherry pie filling and whipped cream.
Ingredients
-
1 ½ cups crushed chocolate cookies
-
¼ cup melted butter
-
3 (8 oz) packages cream cheese, softened
-
1 cup sugar
-
1 teaspoon vanilla extract
-
3 large eggs
-
½ cup sour cream
-
¼ cup unsweetened cocoa powder
-
1 can cherry pie filling
-
Whipped cream, for garnish
-
Chocolate shavings, for garnish
Instructions
-
Step 1
Prepare the crust: Combine 1 ½ cups crushed chocolate cookies with ¼ cup melted butter until evenly moistened. Press firmly into the bottom of a 9-inch springform pan. -
Step 2
Create the cheesecake filling: In a large bowl, beat 3 (8 oz) packages of softened cream cheese with 1 cup of sugar until light and fluffy. Beat in 1 teaspoon of vanilla extract. -
Step 3
Add eggs and flavorings: Beat in 3 large eggs one at a time. Mix in ½ cup sour cream, then sift in ¼ cup unsweetened cocoa powder and mix until just combined. -
Step 4
Bake the cheesecake: Pour the filling over the crust. Bake in a preheated 325°F (160°C) oven for 50-65 minutes, or until the edges are set and the center has a slight jiggle. Use a water bath for best results. -
Step 5
Cool and chill: Turn off the oven, crack the door open, and let the cheesecake cool in the oven for 1 hour. Cool completely at room temperature, then refrigerate for at least 6 hours or overnight. -
Step 6
Garnish and serve: Release the springform ring. Top generously with 1 can of cherry pie filling, whipped cream, and chocolate shavings.
Important Information
Nutrition Facts (Per Serving)
It is important to consider this information as approximate and not to use it as definitive health advice.
Allergy Information
Please check ingredients for potential allergens and consult a health professional if in doubt.