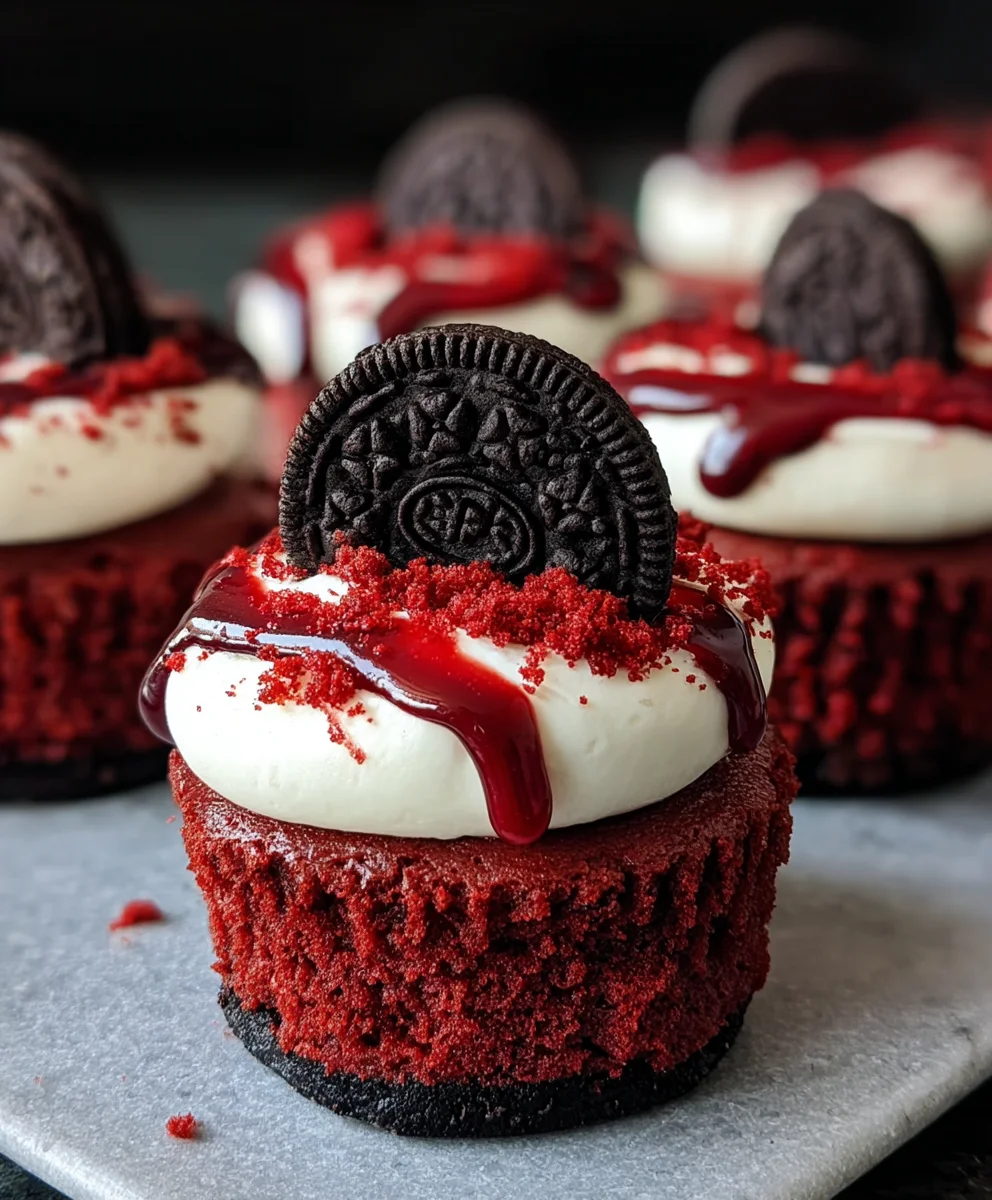
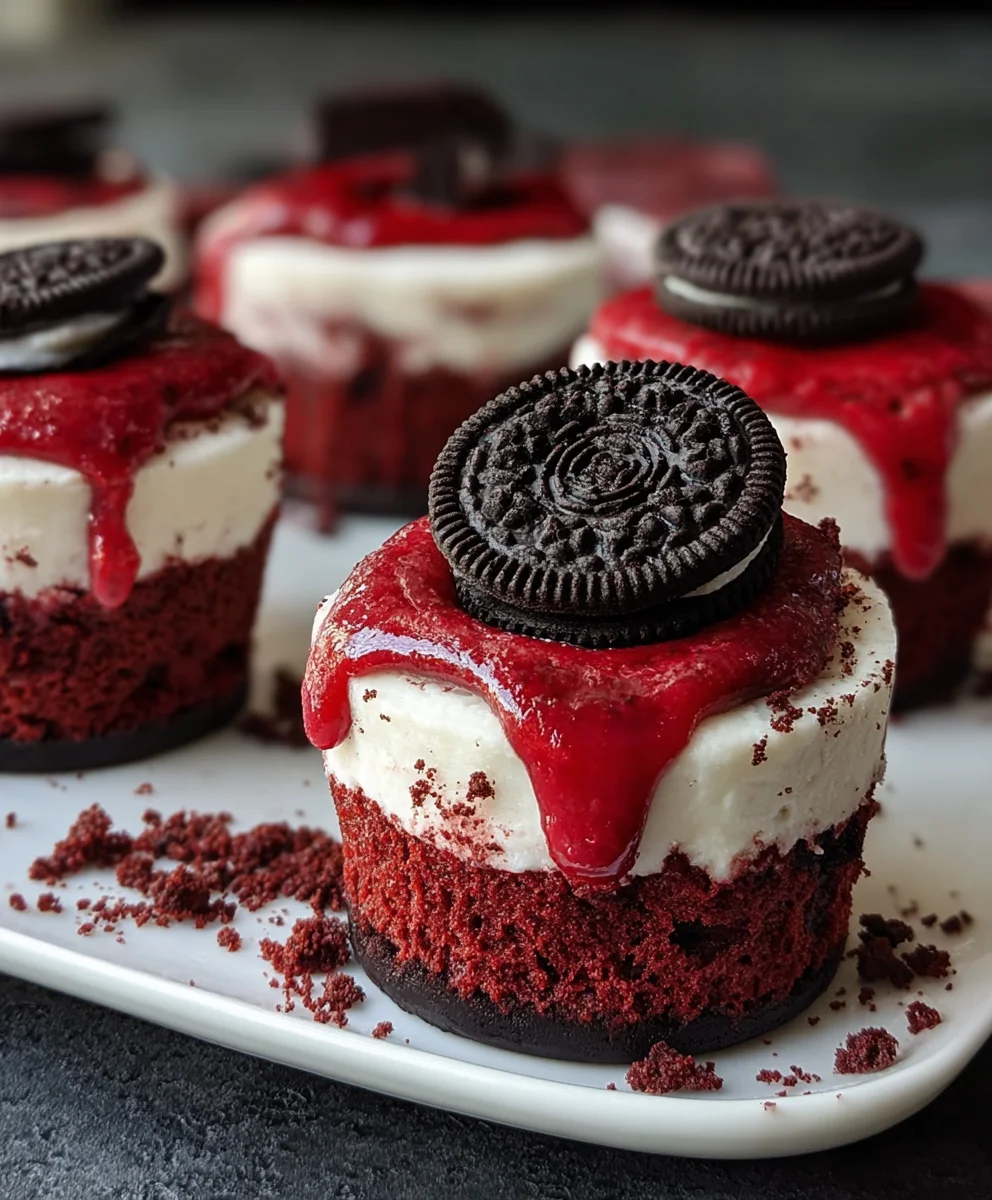
Mini Red Velvet Oreo Cheesecakes-Decadent Dessert
Mini Red Velvet Oreo Cheesecakes are an absolute showstopper, and for good reason! If you’ve ever found yourself captivated by the striking crimson hue and the rich, decadent flavor of red velvet, then prepare to fall head over heels for these individual delights. The magic truly lies in the ingenious fusion of two beloved classics: the intense, chocolatey tang of red velvet cake and the irresistible crunch of Oreo cookies, all swirled together in a creamy, dreamy cheesecake filling. These aren’t just desserts; they’re little edible masterpieces that bring smiles and gasps of delight to any occasion. What makes them so special? It’s that perfect balance of textures and tastes – the crum extractbly Oreo base, the velvety smooth cheesecake, and that unmistakable hint of cocoa and vanilla that defines red velvet. They’re surprisingly easy to make and offer an impressive presentation that will have everyone beggin extractg for the recipe for these divine Mini Red Velvet Oreo Cheesecakes. Get ready to create some serious dessert envy!
Ingredients:
- 12 Oreo cookies, divided
- 3 tablespoons all-purpose flour
- 1/2 cup cocoa powder, divided
- 1/2 cup granulated sugar, divided
- 1/4 cup unsalted butter, melted
- 1 large egg, room temperature, divided
- 1/2 teaspoon vanilla extract, divided
- Pinch of salt
- 8 oz cream cheese, room temperature
- 1/4 cup sour cream, room temperature
- Red gel food coloring
Crust Preparation
Step 1: Crushing the Oreos for the Crust
Begin extract by preparing the delectable base for your Mini Red Velvet Oreo Cheesecakes. You’ll need to finely crush 8 of the Oreo cookies. A food processor is the most efficient tool for this, ensuring a uniform crum extractb. If you don’t have a food processor, don’t worry! You can place the Oreos in a sturdy resealable plastic bag and use a rolling pin to gently but firmly crush them until they resemblrum extractine crumbs. The goal is to get rid of any large chunks. Once crushed, transrum extract these Oreo crumbs to a medium bowl.
Step 2: Assembling the Oreo Crust MixtureStep 3: Pressing the Crusts into the Muffin Tin
This recipe is designed for mini cheesecakes, so you’ll want to prepare a standard muffin tin. Line 12 cups of the muffin tin with paper liners. This makes removal of the finished cheesecakes a breeze and prevents sticking. Divide the Oreo crust mixture evenly among the 12 prepared muffin cups. Using the bottom of a small glass or your fingers, press the mixture firmly and evenly into the bottom of each liner. Aim for a compact layer. You can even press it up the sides slightly to create a small “cup” for the filling.
Cheesecake Filling Preparation
Step 4: Creating the Cream Cheese Base
Now, let’s move on to the star of the show: the creamy cheesecake filling. In a separate large bowl, place your softened 8 oz of cream cheese. Ensure the cream cheese is at room temperature; this is crucial for achieving a smooth, lump-free filling. Beat the cream cheese with an electric mixer on medium speed until it is completely smooth and creamy. This should take about 1-2 minutes. Scrape down the sides of the bowl periodically to make sure all the cream cheese is incorporated.
Step 5: Incorporating Flavors and Color
To the smooth cream cheese, add the remaining 1/4 cup of granulated sugar and the remaining 1/4 cup of cocoa powder. Beat again until well combined and smooth. Now, add 1/4 cup of sour cream and 1/2 teaspoon of vanilla extract. Beat these in on low speed until just combined. Overmixing at this stage can incorporate too much air, which can lead to cracks in your cheesecakes. Finally, it’s time for that signature red velvet hue! Add a few drops of red gel food coloring. Gel coloring is more concentrated than liquid, so start with a small amount and add more until you achieve a vibrant, rich red color. Beat gently until the color is uniform throughout the batter.
Step 6: Adding the Egg and Completing the Filling
For the final step in creating the cheesecake filling, add 1 large egg, which should also be at room temperature for better emulsification. Add the egg and mix on low speed until it is just incorporated. Again, avoid overmixing. Once the egg is mixed in, the filling should be smooth, thick, and a beautiful red color. It’s now ready to be spooned over your prepared Oreo crusts.
Baking and Finishing
Step 7: Filling and Baking the Mini Cheesecakes
Carefully spoon the red velvet cheesecake filling evenly over the Oreo crusts in each muffin cup. Fill each liner about two-thirds of the way full. Gently tap the muffin tin on the counter a couple of times to release any air bubbles that may have been trapped in the filling. Preheat your oven to 325°F (160°C). Bake for 18-22 minutes, or until the edges of the cheesecakes are set and the centers are still slightly jiggly when you gently nudge the pan. Overbaking can lead to a dry cheesecake.
Step 8: Cooling and Garnishing Your Masterpieces
Once baked, remove the muffin tin from the oven and let the mini cheesecakes cool in the tin on a wire rack for about 15-20 minutes. This initial cooling period is important to prevent cracking. After they’ve cooled slightly in the tin, carefully lift the cheesecakes out of the muffin tin using the paper liners and place them on the wire rack to cool completely. Once completely cool, you can garnish them. Take the remaining 4 Oreo cookies and finely chop them. Sprinkle the chopped Oreos over the top of each mini red velvet cheesecake for a delightful finish. For an extra touch, you could also add a dollop of whipped cream or a drizzle of chocolate sauce. Refrigerate the Mini Red Velvet Oreo Cheesecakes for at least 2 hours, or until thoroughly chilled, before serving. This allows the flavors to meld and the texture to firm up perfectly.
Conclusion:
And there you have it – your guide to creating the most delightful Mini Red Velvet Oreo Cheesecakes! This recipe offers a perfect balance of rich, creamy cheesecake, the satisfying crunch of Oreo, and that iconic vibrant red velvet flavor. They’re truly a showstopper for any occasion, from intimate gatherings to larger celebrations. I hope you enjoy making and sharing these delicious treats as much as I do!
For serving, these mini cheesecakes are wonderful on their own, but they also pair beautifully with a dollop of fresh whipped cream, a dusting of powdered sugar, or even a drizzle of chocolate ganache. They are perfectly sized for individual desserts, making them incredibly convenient.
Don’t be afraid to experiment with variations! You could add a swirl of cream cheese frosting on top for an extra decadent touch, or perhaps sprinkle some chocolate chips into the batter. For a festive twist, consider adding a tiny bit of food-grade glitter after baking.
I encourage you to give these Mini Red Velvet Oreo Cheesecakes a try. The process is surprisingly manageable, and the results are incredibly rewarding. Happy baking!
FAQs
Can I make these ahead of time?
Absolutely! Mini Red Velvet Oreo Cheesecakes can be made up to two days in advance. Store them covered in the refrigerator. They often taste even better the next day as the flavors meld together.
What if I don’t have mini cheesecake pans?
If you don’t have mini cheesecake pans, you can adapt this recipe for a regular 9-inch springform pan. You’ll likely need to adjust the baking time, so start checking for doneness around 45-50 minutes and continue until the center is set but slightly jiggly.
Can I use a different type of cookie for the crust?
While Oreos are classic for this recipe, you can certainly experiment! Grabeef ham crackers, chocolate chip cookies, or even shortbread cookies could be used to create a delicious alternative crust for your Mini Red Velvet Oreo Cheesecakes.
Mini Red Velvet Oreo Cheesecakes-Decadent Dessert
Indulge in these decadent Mini Red Velvet Oreo Cheesecakes, a perfect combination of rich red velvet flavor and classic Oreo crunch.
Ingredients
-
12 Oreo cookies, divided
-
3 tablespoons all-purpose flour
-
1/2 cup cocoa powder
-
1/2 cup granulated sugar
-
1/4 cup unsalted butter, melted
-
1 egg, room temperature
-
1/2 teaspoon vanilla extract
-
Pinch of salt
-
8 oz cream cheese, room temperature
-
1/4 cup sour cream, room temperature
-
Red gel food coloring
-
1/4 cup granulated sugar
-
1 tablespoon cocoa powder
-
1/2 teaspoon vanilla extract
Instructions
-
Step 1
Prepare the crust: Finely crush 8 Oreo cookies. Combine crumbs with flour, 1/4 cup cocoa powder, 1/4 cup granulated sugar, pinch of salt, and melted butter. Mix until it resembles wet sand. Press mixture into 12 lined muffin cups. -
Step 2
Make the cheesecake filling: Beat room temperature cream cheese until smooth. Add remaining 1/4 cup granulated sugar and 1 tablespoon cocoa powder; beat until combined. -
Step 3
Incorporate flavors and color: Stir in sour cream and 1/2 teaspoon vanilla extract on low speed. Add red gel food coloring until a vibrant red is achieved. Gently mix until uniform. -
Step 4
Add the egg: Beat in the room temperature egg on low speed until just incorporated. Do not overmix. -
Step 5
Bake: Spoon filling over crusts, filling about two-thirds full. Tap tin to remove air bubbles. Bake at 325°F (160°C) for 18-22 minutes until edges are set and centers are slightly jiggly. -
Step 6
Cool and garnish: Cool in tin for 15-20 minutes, then remove and cool completely on a wire rack. Chop the remaining 4 Oreo cookies and sprinkle over the cheesecakes. Refrigerate for at least 2 hours before serving.
Important Information
Nutrition Facts (Per Serving)
It is important to consider this information as approximate and not to use it as definitive health advice.
Allergy Information
Please check ingredients for potential allergens and consult a health professional if in doubt.