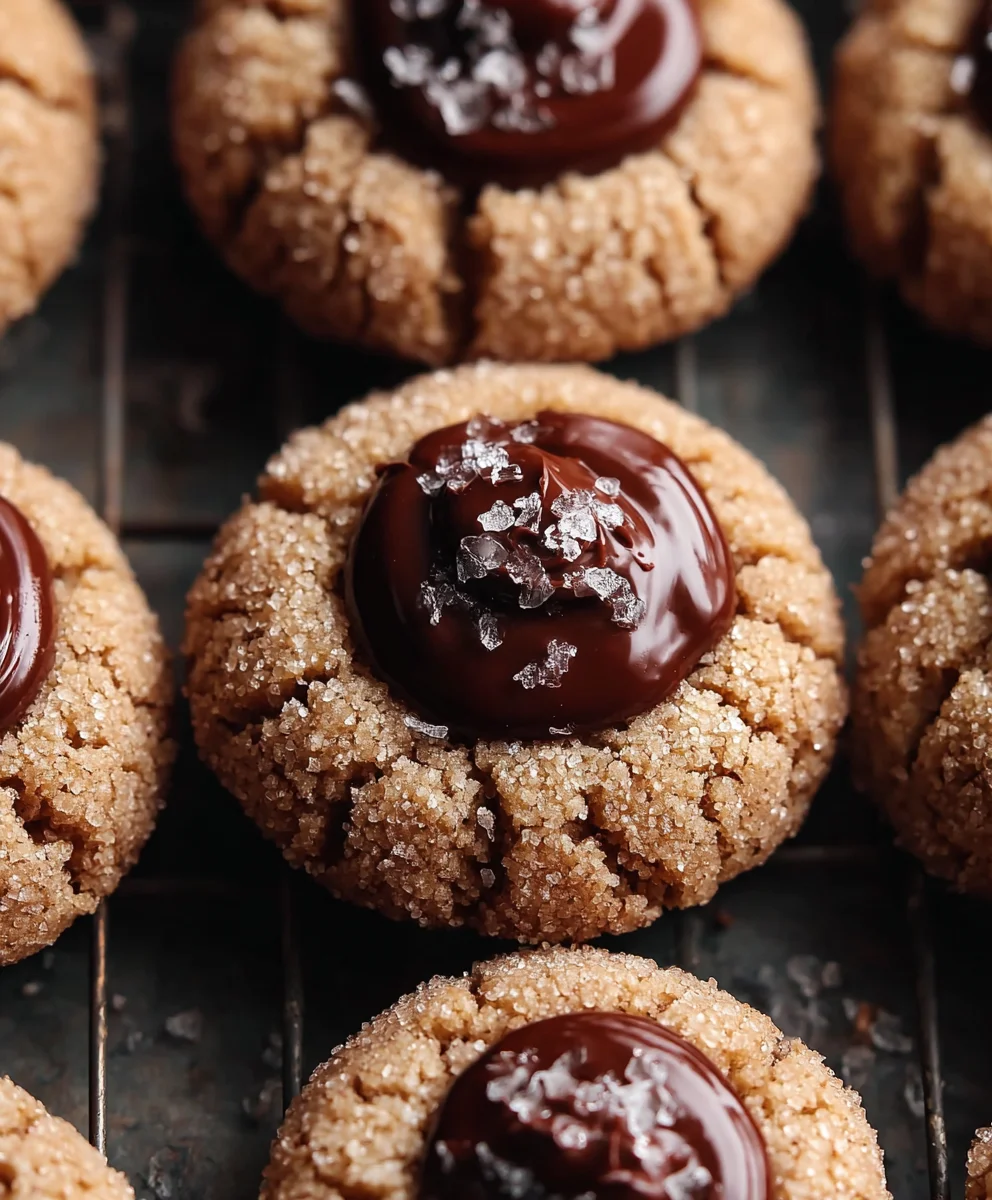
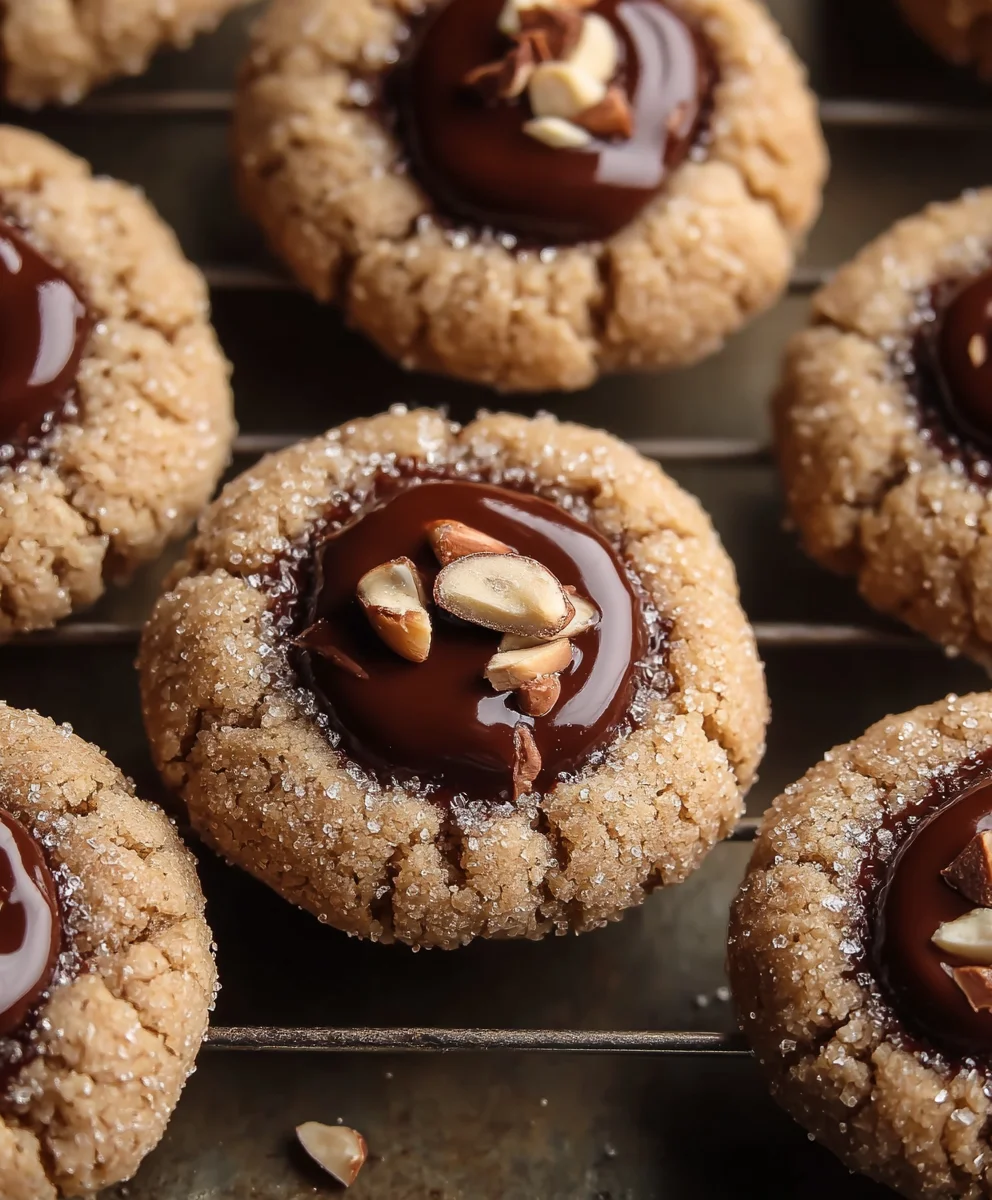
Nutella Thumbprint Cookies-Irresistible Chocolate Hazelnut Treats
Nutella Thumbprint Cookies are more than just a sweet treat; they’re a warm hug in cookie form, a delightful dance of buttery shortbread and rich, velvety hazelnut-chocolate spread. Who can resist the allure of these perfectly formed circles, indented to cradle a molten core of pure bliss? I know I certainly can’t! They evoke memories of cozy afternoons, shared laughter, and the simple joy of creating something delicious with your own hands. What truly sets these Nutella Thumbprint Cookies apart is their incredible versatility. They’re perfect for holiday cookie platters, birthday celebrations, or simply when you need a little pick-me-up. The contrast between the slightly crum extractbly, tender cookie and the gooey, intensely flavored Nutella filling is absolutely divine. Get ready to discover why these Nutella Thumbprint Cookies are destined to become a beloved staple in your baking repertoire.
Ingredients:
- 2¼ cups all-purpose flour
- 1 tablespoon cornstarch
- 2 teaspoons baking powder
- ½ teaspoon baking soda
- ½ teaspoon fine sea salt
- ⅓ cup hazelnuts, finely chopped (for the dough)
- ½ cup unsalted butter, softened
- 8 oz cream cheese, softened
- 1½ cups granulated sugar (for the dough)
- 1 whole egg, at room temperature
- 1 egg yolk, at room temperature
- 2 teaspoons vanilla bean paste or extract
- ⅓ cup hazelnuts, finely chopped (for topping)
- 1 tablespoon granulated sugar (for topping)
- Nutella, for filling the centers
Making the Nutella Thumbprint Cookies
The magic of a good thumbprint cookie lies in its tender crum extractb and the delightful pool of filling at its heart. These Nutella Thumbprint Cookies elevate this classic with the subtle crunch and nutty aroma of hazelnuts, making them a truly special treat. We’ll begin extract by preparing our dry ingredients, ensuring everything is well combined for an even bake.
Stage 1: Preparing the Dough Base
First, in a medium bowl, whisk together the 2¼ cups of all-purpose flour, 1 tablespoon of cornstarch, 2 teaspoons of baking powder, ½ teaspoon of baking soda, and ½ teaspoon of fine sea salt. The cornstarch is our little secret ingredient here; it helps to create a wonderfully tender and melt-in-your-mouth cookie texture. Give this mixture a good whisk to ensure the leavening agents and salt are evenly distributed throughout the flour. Set this bowl aside for now.
In a separate large mixing bowl, we’ll cream together the softened ½ cup of unsalted butter and the 8 oz of softened cream cheese. It’s crucial that both the butter and cream cheese are at room temperature. This allows them to emulsify properly with the sugar, creating a light and airy base for our cookie dough. Use an electric mixer (handheld or stand mixer with the paddle attachment) to beat them together until they are smooth and well combined, with no lumps remaining. Gradually add the 1½ cups of granulated sugar to this mixture, continuing to beat until the mixture is pnon-alcoholic ale and fluffy. This process, known as creaming, incorporates air into the dough, which contributes to the cookie’s texture and spread.
Now, it’s time to add the eggs. Add the whole room temperature egg and the room temperature egg yolk to the creamed mixture. Beat them in one at a time, ensuring each egg is fully incorporated before adding the next. This helps to create a stable emulsion. Next, stir in the 2 teaspoons of vanilla bean paste or extract. The vanilla bean paste, with its visible flecks, will add a more intense vanilla flavor and a beautiful visual appeal, but good quality vanilla extract will also work wonderfully.
Stage 2: Combining and Chilling the Dough
With the wet ingredients all beautifully combined, it’s time to introduce our dry ingredients. Gradually add the flour mixture to the wet ingredients in two or three additions, mixing on low speed until just combined. Be careful not to overmix the dough at this stage. Overmixing can develop the gluten in the flour too much, resulting in tougher cookies. You want the dough to just come together into a soft, pliable mass.
Now, gently fold in the ⅓ cup of finely chopped hazelnuts that you’ll be using in the dough. These will provide a delightful nutty crunch within each cookie. Once the hazelnuts are evenly distributed, the dough is ready for its chilling phase. Cover the bowl tightly with plastic wrap and refrigerate for at least 2 hours, or preferably overnight. Chilling the dough is a vital step. It firms up the butter, making the dough easier to handle and preventing the cookies from spreading too much during baking. It also allows the flavors to meld and deepen.
Stage 3: Shaping and Filling the Cookies
When you’re ready to bake, preheat your oven to 350°F (175°C). Line baking sheets with parchment paper. In a small bowl, combine the remaining ⅓ cup of finely chopped hazelnuts with the 1 tablespoon of granulated sugar. This will be our nutty topping for the cookies, adding an extra layer of texture and flavor.
Remove the chilled dough from the refrigerator. Scoop rounded tablespoons of dough and roll them into balls. Gently roll each ball in the hazelnut-sugar mixture, coating it evenly. Place the coated dough balls about 2 inches apart on the prepared baking sheets.
Now for the “thumbprint” part! Using your thumb or the back of a small spoon, create an indentation in the center of each dough ball. Make the indentation deep enough to hold a generous amount of Nutella, but not so deep that you go through to the bottom of the cookie. If the dough cracks slightly around the indentation, you can gently press it back together.
Stage 4: Baking and Filling
Before filling, let’s give these beauties their first bake. Bake the cookies for 10-12 minutes, or until the edges are lightly golden brown. They should still look slightly soft in the center. Remove the baking sheets from the oven and immediately re-create or deepen the indentations with your thumb or spoon. The cookies will continue to cook slightly as they cool, and this second press ensures the indentations are perfect for holding our delicious filling.
Let the cookies cool on the baking sheets for 5-10 minutes before carefully transferring them to a wire rack to cool completely. This allows them to set up properly. Once the cookies are completely cool, it’s time for the best part: filling! Spoon a generous dollop of Nutella into each indentation. You can use a small spoon or a piping bag for a neater finish. If you prefer a smoother Nutella filling, you can warm it slightly in the microwave for a few seconds, stirring until it’s spreadable.
Stage 5: Finishing Touches and Enjoyment
Once filled, your Nutella Thumbprint Cookies are ready to be admired and, more importantly, devoured. The combination of the tender, slightly crisp cookie, the rich hazelnut flavor, and the sweet, creamy Nutella creates an irresistible treat. These cookies are perfect for sharing with loved ones, packing in lunchboxes, or enjoying with a cup of coffee or tea. They store well in an airtight container at room temperature for several days, though they rarely last that long!
Conclusion:
There you have it – the ultimate guide to creating delicious Nutella Thumbprint Cookies! We’ve walked through each step, from selecting the perfect ingredients to achieving that signature indentation and golden-brown perfection. These cookies are a delightful blend of buttery shortbread and rich, hazelnut chocolate spread, making them an irresistible treat for any occasion. Imagin extracte them fresh from the oven, the Nutella slightly molten, creating a perfect gooey center. They’re wonderful on their own, but for an extra touch of elegance, consider dusting them with a little powdered sugar or drizzling them with melted chocolate. These Nutella Thumbprint Cookies are also incredibly versatile. Feel free to experiment by adding a pinch of sea salt to the dough for a sweet and salty contrast, or even a hint of espresso powder for a mocha twist. Don’t be afraid to get creative and make them your own! I encourage you to give this recipe a try; you’ll be amazed at how simple it is to create such a crowd-pleasing dessert. Enjoy every bite!
Frequently Asked Questions:
What is the best way to store Nutella Thumbprint Cookies?
To keep your Nutella Thumbprint Cookies fresh, store them in an airtight container at room temperature for up to 3-4 days. For longer storage, you can freeze the baked cookies for up to 2 months. Ensure they are completely cooled before storing.
Can I make the dough for these cookies ahead of time?
Yes, absolutely! You can prepare the cookie dough and refrigerate it for up to 2 days or freeze it for up to 1 month. If refrigerated, let the dough sit at room temperature for about 15-20 minutes to make it easier to roll into balls. If frozen, thaw overnight in the refrigerator before proceeding with the recipe.
Nutella Thumbprint Cookies-Irresistible Chocolate Hazelnut Treats
These Nutella Thumbprint Cookies combine a tender, slightly crisp cookie with the rich flavor of hazelnuts and a delightful pool of creamy Nutella filling.
Ingredients
-
2¼ cups all-purpose flour (282g)
-
1 tablespoon cornstarch (8g)
-
2 teaspoons baking powder
-
½ teaspoon baking soda
-
½ teaspoon fine sea salt
-
⅓ cup hazelnuts, finely chopped (50g)
-
½ cup unsalted butter, softened (113g)
-
8 oz cream cheese, softened (226g)
-
1½ cups granulated sugar (300g)
-
1 whole egg, room temperature
-
1 egg yolk, room temperature
-
2 teaspoons vanilla bean paste or extract
-
⅓ cup hazelnuts, finely chopped (50g)
-
1 tablespoon granulated sugar
-
Nutella, for filling the centers
Instructions
-
Step 1
In a medium bowl, whisk together flour, cornstarch, baking powder, baking soda, and salt. In a separate large bowl, cream together softened butter and cream cheese until smooth. Gradually add granulated sugar and beat until pale and fluffy. Beat in the whole egg, then the egg yolk, one at a time. Stir in vanilla bean paste or extract. -
Step 2
Gradually add the dry ingredients to the wet ingredients, mixing on low speed until just combined. Gently fold in ⅓ cup of finely chopped hazelnuts. Cover the dough tightly with plastic wrap and refrigerate for at least 2 hours, or preferably overnight. -
Step 3
Preheat oven to 350°F (175°C). Line baking sheets with parchment paper. In a small bowl, combine the remaining ⅓ cup of finely chopped hazelnuts with 1 tablespoon of granulated sugar. -
Step 4
Scoop rounded tablespoons of chilled dough, roll into balls, and gently roll in the hazelnut-sugar mixture. Place on prepared baking sheets. Using your thumb or the back of a small spoon, create an indentation in the center of each dough ball. -
Step 5
Bake for 10-12 minutes, or until the edges are lightly golden brown. Remove from oven and immediately re-create or deepen the indentations. Let cookies cool on baking sheets for 5-10 minutes before transferring to a wire rack to cool completely. -
Step 6
Once completely cool, spoon a generous dollop of Nutella into each indentation. Warm Nutella slightly if desired for easier spreading. Enjoy your irresistible chocolate hazelnut treats!
Important Information
Nutrition Facts (Per Serving)
It is important to consider this information as approximate and not to use it as definitive health advice.
Allergy Information
Please check ingredients for potential allergens and consult a health professional if in doubt.