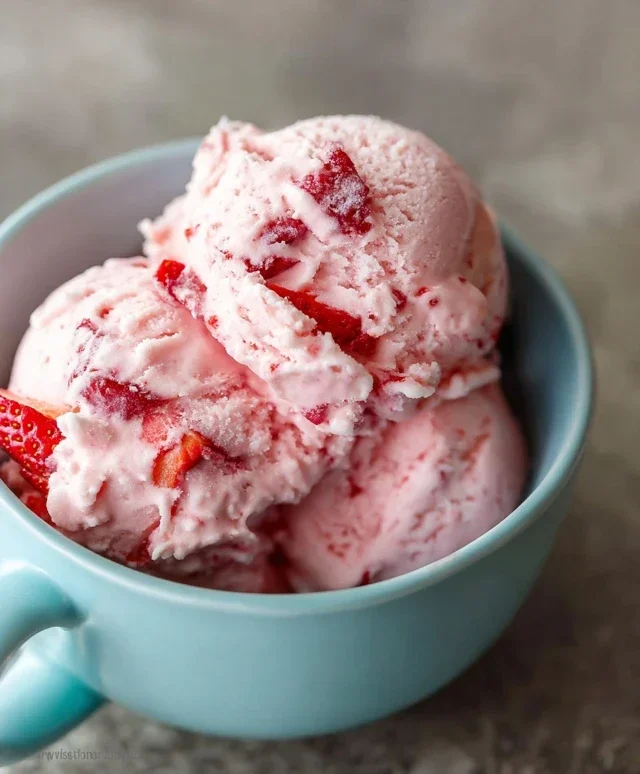
Easy Homemade Strawberry Ice Cream Recipe
Homemade Strawberry Ice Cream is more than just a dessert; it’s a portal to pure, unadulterated summer joy. Imagin extracte sun-ripened strawberries bursting with sweet, tangy flavor, transformed into a creamy, dreamy concoction that melts on your tongue. There’s a reason this classic holds such a special place in our hearts. It evokes memories of childhood picnics, lazy afternoons, and the simple pleasure of a perfectly sweet treat. What truly sets homemade strawberry ice cream apart is its incredible freshness. Unlike store-bought versions, you control the quality of your ingredients, ensuring a vibrant, natural strawberry taste without artificial flavors or colors. This recipe lets you capture the essence of peak-season berries, creating a frozen masterpiece that’s both comforting and utterly refreshing. Get ready to experience the ultimate homemade strawberry ice cream!
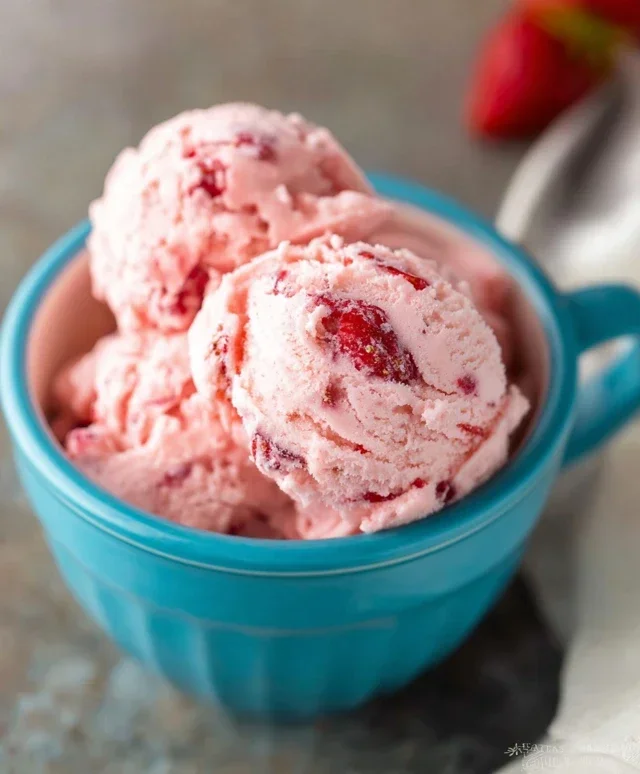
Homemade Strawberry Ice Cream: A Sweet Summer Treat
There’s something incredibly nostalgic and satisfying about homemade ice cream. The creamy texture, the vibrant flavor, and the knowledge that you made it with your own two hands – it’s a feeling unmatched by anything store-bought. And when it comes to classic flavors, it’s hard to beat the sweet, slightly tart, and utterly delightful taste of fresh strawberry ice cream. Forget those artificial-tasting frozen desserts; this recipe will guide you through creating a rich, luscious strawberry ice cream that tastes like sunshine in a scoop. It’s surprisingly simple, and the results are truly worth the minimal effort. So, let’s get ready to churn up some happiness!
Ingredients:
Preparing the Strawberry Base
The foundation of any great strawberry ice cream is, of course, the strawberries themselves. For the best flavor, I highly recommend using ripe, in-season strawberries. The sweetness and intensity of your berries will directly translate into the final product. First, make sure to hull your strawberries, meaning remove the green leafy tops. Then, dice them into small pieces. This will help them break down more easily.
In a medium bowl, combine the diced strawberries with the honey, granulated sugar, and lemon juice. The honey adds a lovely depth of flavor and a touch of natural sweetness, while the sugar provides structure and sweetness. The lemon juice is a secret weapon; it doesn’t make the ice cream taste lemony, but rather it brightens and enhances the natural sweetness and tartness of the strawberries, making their flavor pop. Give everything a gentle stir to combine.
Now, it’s time to let those flavors meld. For optimal results, cover the bowl and let the strawberry mixture sit for at least 30 minutes, or even better, an hour. This maceration process allows the sugar and honey to draw out the juices from the strawberries, creating a more concentrated and intensely flavored syrup. You’ll notice the berries softening and releasing their vibrant red liquid. This infused syrup is pure gold for our ice cream!
Once macerated, you have two options for processing the strawberries, depending on your desired texture. For a smoother ice cream with no visible strawberry chunks, you can carefully transfer the strawberry mixture into a blender or food processor and puree it until smooth. For a more rustic, slightly chunky ice cream, you can simply mash the strawberries with a fork or potato masher after they’ve macerated. I personally love the texture that a quick blend provides, ensuring a silky smooth ice cream without being completely puréed into oblivion.
Creating the Creamy Ice Cream Base
While your strawberries are macerating, it’s time to prepare the dairy base for our ice cream. In a separate, clean bowl, combine the heavy whipping cream and the half and half. Heavy whipping cream is crucial for that rich, decadent texture that we all associate with premium ice cream. Half and half provides the perfect balance, adding creaminess without making the base overly heavy. Whisk these two together until they are well combined.
Next, stir in the vanilla extract. Vanilla is a classic partner to strawberry, as it enhances and rounds out the berry flavor. Make sure to use a good quality vanilla extract for the best aroma and taste.
Now, we’ll bring our strawberry and dairy components together. Gently fold the prepared strawberry mixture (whether puréed or mashed) into the cream and half and half mixture. Stir until it’s just combined. You want to see beautiful swirls of red throughout the pnon-alcoholic ale cream base. Avoid overmixing at this stage; we’re just incorporating the flavors.
Chilling and Churning
This step is vital for achieving the perfect ice cream texture. Before you can churn your ice cream, the base needs to be thoroughly chilled. This is because ice cream makers work best when the base is very cold. Transfer the combined strawberry and cream mixture into an airtight container or cover the bowl tightly with plastic wrap. Place it in the refrigerator for at least 2 to 4 hours, or ideally, overnight. The colder the base, the faster and more efficiently your ice cream maker will freeze it.
Once your base is thoroughly chilled, it’s time to churn! Follow the instructions for your specific ice cream maker. Typically, you’ll pour the chilled base into the pre-frozen bowl of your ice cream maker and let it churn for about 20-30 minutes, or until it reaches a soft-serve consistency. This process whips air into the mixture while freezing it, creating that signature light and creamy texture. Resist the temptation to open the lid too often, as this can let in warm air and slow down the freezing process.
Freezing to Perfection
After churning, your ice cream will be delightfully soft and scoopable, but it’s not quite ready for that final firm texture. Transfer the churned ice cream into a freezer-safe container. A shallow, wide container works best for quick and even freezing. Press a piece of parchment paper or plastic wrap directly onto the surface of the ice cream to prevent ice crystals from forming. Then, cover the container with its lid or another layer of plastic wrap.
Now, the hardest part: waiting. Place the container in the freezer for at least 4 to 6 hours, or until the ice cream is firm enough to scoop. This hardening process allows the ice cream to firm up completely, resulting in that satisfying, classic ice cream texture. Patience is key here, but the reward is an absolutely delicious, homemade strawberry ice cream that will have everyone asking for seconds. Enjoy every creamy, fruity bite!
Conclusion:
There you have it – your guide to crafting the most delightful homemade strawberry ice cream! We’ve explored a recipe that’s remarkably simple yet yields an incredibly rich and creamy dessert, bursting with the natural sweetness and vibrant flavor of fresh strawberries. This isn’t just ice cream; it’s a taste of pure summer joy, made right in your own kitchen. The satisfaction of creating something so delicious from scratch is truly unparalleled. Serve it in cones, bowls, or even alongside a slice of warm pound cake for an extra special treat. Don’t be afraid to get creative with variations – a swirl of balsamic glaze, a sprinkle of dark chocolate chips, or even a hint of basil can elevate your strawberry ice cream to new heights. I truly encourage you to give this recipe a try; the results are absolutely worth it!
Frequently Asked Questions about Homemade Strawberry Ice Cream:
Q: My ice cream isn’t as creamy as I’d hoped. What did I do wrong?
A: Creaminess often comes down to fat content and how well air is incorporated. Ensure you’re using heavy cream and whole milk as specified. Churning long enough until it reaches a soft-serve consistency is also key. If you’re not using an ice cream maker, you’ll need to stir frequently during the freezing process to break up ice crystals.
Q: Can I make this recipe without an ice cream maker?
A: Absolutely! While an ice cream maker makes it easier, you can achieve a delicious result without one. After preparing the base and chilling it thoroughly, pour it into a freezer-safe container. Every 30-45 minutes for the first 3-4 hours, remove it from the freezer and vigorously stir with a fork or whisk to break up ice crystals. This will help create a smoother texture.
Q: How long does homemade strawberry ice cream typically last?
A: Properly stored, your homemade strawberry ice cream should last for about 1-2 weeks in the freezer. For best results, keep it in an airtight container and press a piece of parchment paper directly onto the surface of the ice cream before sealing to minimize ice crystal formation.
Homemade Strawberry Ice Cream
A delicious and easy homemade strawberry ice cream recipe, perfect for a sweet treat.
Ingredients
-
1 1/2 cups strawberries, hulled and diced
-
2 Tbsp honey
-
1/2 cup granulated sugar
-
1 tsp lemon juice
-
1 cup heavy whipping cream
-
1/2 cup half and half
-
1 tsp vanilla extract
Instructions
-
Step 1
Puree the strawberries in a blender or food processor until smooth. Add the honey, granulated sugar, and lemon juice, and blend again until combined. -
Step 2
In a separate bowl, whip the heavy whipping cream until stiff peaks form. -
Step 3
Gently fold the half and half and vanilla extract into the whipped cream. -
Step 4
Fold the strawberry puree mixture into the whipped cream mixture until just combined, creating swirls. -
Step 5
Pour the mixture into a freezer-safe container, cover, and freeze for at least 4-6 hours, or until firm. -
Step 6
Let the ice cream sit at room temperature for a few minutes before scooping and serving.
Important Information
Nutrition Facts (Per Serving)
It is important to consider this information as approximate and not to use it as definitive health advice.
Allergy Information
Please check ingredients for potential allergens and consult a health professional if in doubt.