Sticky Coconut Cake Recipe – Moist & Delicious
Sticky Coconut Cake is more than just a dessert; it’s a tropical escape in every bite. There’s something utterly irresistible about the way the rich, caramel-like glaze clings to the tender, moist crum extractb, creating a symphony of textures and flavors that transport you straight to a sun-drenched island. We all have those cravings for something comforting yet exotic, and this Sticky Coconut Cake delivers precisely that. It’s the perfect balance of sweet, nutty coconut and the luscious, buttery topping that makes it so incredibly special and a guaranteed crowd-pleaser. Forget your everyday bakes; this is the one that will have everyone asking for seconds, and secrets!
Get ready to fall in love.
Sticky Coconut Cake
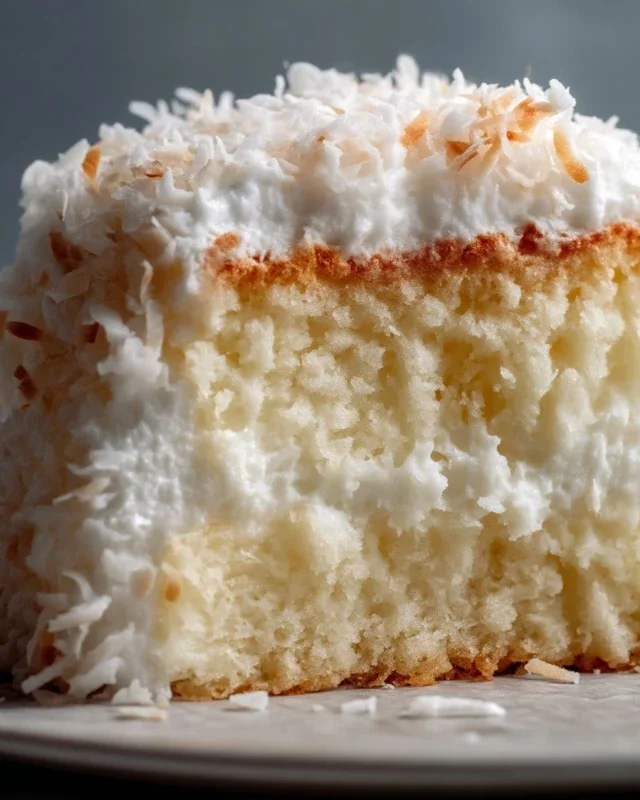
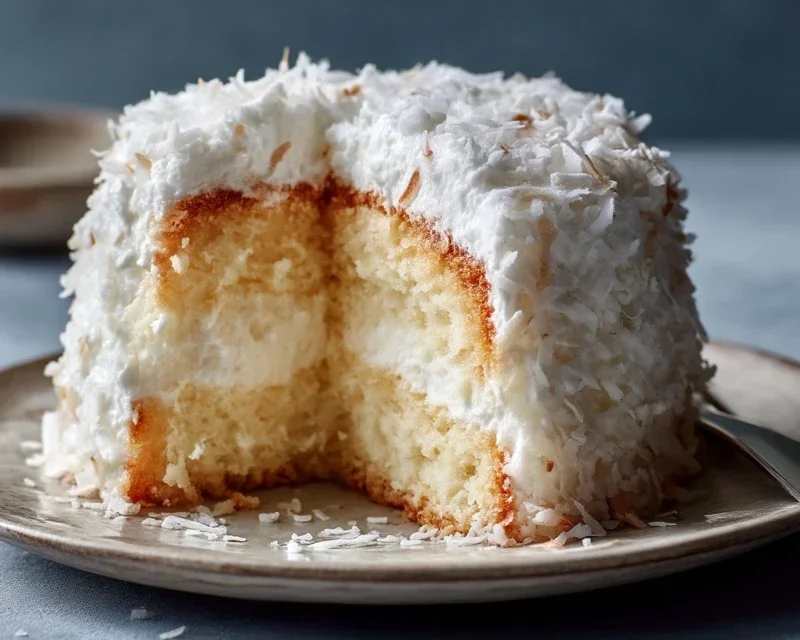
There’s something incredibly comforting and satisfying about a cake that’s both tender and delightfully chewy, with the rich, tropical embrace of coconut. This Sticky Coconut Cake is exactly that. It’s not your typical light and airy sponge; instead, it offers a denser, more substantial texture that’s incredibly moreish. The sweetness is perfectly balanced by the creamy coconut milk, and the toasted coconut topping adds a wonderful crunch. This recipe is surprisingly simple to follow, making it an excellent choice for both begin extractner bakers and seasoned pros looking for a new favorite. I love making this cake for weekend brunches, as an afternoon treat, or even as a simple dessert after a light meal. The aroma that fills your kitchen as it bakes is truly heavenly!
Ingredients:
Preparing the Batter
The first step in creating this delightful cake is to get our ingredients ready and start building the base of our batter. We’ll begin extract by preheating our oven to a moderate 350°F (175°C). It’s crucial to have your oven at the correct temperature before your cake goes in to ensure even baking and prevent any unexpected sinking or burning. Next, prepare your baking pan. I usually opt for a 9×13 inch baking pan for this recipe. Grease it generously with butter or non-stick cooking spray, and then lightly dust it with flour. This will prevent the cake from sticking and make for easy removal once it’s baked.
Now, let’s get to the batter itself. In a large mixing bowl, we’ll combine our egg yolks and granulated sugar. Using an electric mixer or a whisk, beat these together until the mixture becomes pnon-alcoholic ale yellow and slightly thickened. This process, known as creaming, helps to incorporate air into the batter, which contributes to the cake’s overall texture. Don’t rush this step; a few minutes of vigorous beating will make a difference.
Once you’ve achieved that lovely pnon-alcoholic ale, fluffy consistency, it’s time to add the wet ingredients. Pour in the full fat canned coconut milk and the vanilla extract. Whisk these in until everything is well combined. The full fat coconut milk is key here; it provides that rich, creamy flavor and contributes to the signature chewy texture of the cake. If you try to substitute with a lower fat version, you’ll likely get a different result.
Now for the dry ingredients. In a separate bowl, whisk together the glutinous rice flour. Glutinous rice flour is what gives this cake its unique sticky and chewy characteristic. It’s different from regular rice flour and is essential for achieving the desired texture. Add this to your wet ingredient mixture. It might seem like a lot of flour, but trust the process! Gently mix everything together until just combined. Be careful not to overmix at this stage, as overmixing can develop the gluten in the flour and result in a tough cake. You want a smooth, thick batter.
Whipping the Egg Whites
This next step is what gives our cake a little lift and helps to create that tender crum extractb. In a clean, dry bowl, add your 2 egg whites. Ensure there is absolutely no trace of yolk in the egg whites, as this will prevent them from whipping properly. You can use a hand mixer or a stand mixer for this. Start beating the egg whites on medium speed until they form soft peaks. Soft peaks mean that when you lift the whisk, the egg whites will curl over.
Now, gradually increase the mixer speed to high. Continue to beat until you achieve stiff, glossy peaks. This means that when you lift the whisk, the egg whites will stand straight up without drooping. They should look shiny and firm. This is a crucial stage for incorporating air, which will make our cake lighter and less dense. Don’t overbeat them, or they can become dry and crum extractbly.
Combining and Baking
Now it’s time to gently fold the whipped egg whites into our coconut batter. This is a delicate process, and the goal is to incorporate the air from the egg whites without deflating them too much. Take a spatula and gently scoop about a third of the whipped egg whites into the batter. Use a cutting and folding motion to incorporate them. Don’t stir or beat; just gently lift from the bottom of the bowl and fold over the top. Repeat this process with the remaining two-thirds of the egg whites, adding them in two more additions, folding gently after each. You want the batter to be uniform in color and consistency, with no streaks of egg white remaining, but it should still feel light and airy.
Pour the batter into your prepared baking pan. Spread it out evenly with your spatula. Now, sprinkle the 3 cups of shredded sweetened coconut evenly over the top of the batter. This topping will toast beautifully in the oven, creating a wonderfully crunchy and flavorful crust.
Place the pan in your preheated oven and bake for approximately 45-55 minutes. The exact baking time can vary depending on your oven, so it’s always best to check for doneness. You’ll know the cake is ready when it’s golden brown on top, and a toothpick inserted into the center comes out clean. The edges should also be pulling away slightly from the sides of the pan.
Once baked, remove the cake from the oven and let it cool in the pan on a wire rack for about 15-20 minutes. This allows the cake to set further before you attempt to cut it. After this initial cooling period, you can carefully invert the cake onto the wire rack to cool completely. If you try to cut it while it’s still very hot, it might be too delicate. Once completely cool, slice and serve. Enjoy the delightful chegrape juicess and rich coconut flavor!
Conclusion:
I hope you’re as excited as I am to try this incredible Sticky Coconut Cake! This recipe truly delivers a sensational dessert experience. The moist, tender crum extractb infused with fragrant coconut milk and the delightful sticky topping creates a symphony of textures and flavors that is simply irresistible. It’s the perfect balance of sweetness and tropical goodness, making it a standout choice for any occasion. Whether you’re a seasoned baker or just starting out, this cake is surprisingly achievable and promises to impress your family and friends. I truly encourage you to give it a go – you won’t be disappointed!
This cake is wonderfully versatile. For a truly decadent treat, serve it warm with a scoop of vanilla bean ice cream or a dollop of lightly sweetened whipped cream. A drizzle of extra coconut milk or a sprinkle of toasted coconut flakes also adds a lovely touch. If you’re feeling adventurous, consider adding a hint of lime zest to the batter for a brighter citrus note, or perhaps some finely chopped candied gin extractger for a subtle spicy kick. The possibilities for customization are endless!
Frequently Asked Questions:
Can I make this sticky coconut cake ahead of time?
Absolutely! The cake can be baked and cooled completely, then stored in an airtight container at room temperature for up to 2 days. You can also refrigerate it for up to 4 days, just allow it to come to room temperature before serving for the best texture and flavor.
What kind of coconut milk should I use?
Full-fat canned coconut milk is best for this recipe. It provides the richest flavor and creamiest texture. Lite coconut milk will still work, but the cake might be slightly less moist and the coconut flavor less pronounced.
How do I ensure the sticky topping is perfectly gooey?
The key to a perfect sticky topping is to ensure your butter and sugar are properly melted and combined before adding the coconut. Don’t overcook the topping once it’s on the cake, as it can become too firm. Keep an eye on it and aim for that beautiful, glistening sheen.
Sticky Coconut Cake
A delightfully sweet and moist cake featuring the rich flavors of coconut and the unique texture of glutinous rice flour. Perfect for dessert or a special treat.
Ingredients
-
2 eggs, separated
-
1¼ cup granulated sugar
-
2¼ cup full fat canned coconut milk
-
3 cups shredded sweetened coconut
-
1½ cup glutinous rice flour
-
1 teaspoon vanilla extract
Instructions
-
Step 1
Preheat your oven to 350°F (175°C) and grease and flour a 9×13 inch baking pan. -
Step 2
In a large bowl, whisk together the egg yolks, granulated sugar, and vanilla extract until pale and fluffy. -
Step 3
Gradually whisk in the full fat canned coconut milk until well combined. -
Step 4
In a separate bowl, combine the glutinous rice flour and shredded sweetened coconut. Add this dry mixture to the wet ingredients and stir until just combined, being careful not to overmix. -
Step 5
In another clean bowl, beat the egg whites until stiff peaks form. Gently fold the beaten egg whites into the cake batter. -
Step 6
Pour the batter into the prepared baking pan and spread evenly. -
Step 7
Bake for 45-55 minutes, or until a toothpick inserted into the center comes out clean and the top is golden brown. -
Step 8
Let the cake cool in the pan for at least 20 minutes before inverting onto a wire rack to cool completely.
Important Information
Nutrition Facts (Per Serving)
It is important to consider this information as approximate and not to use it as definitive health advice.
Allergy Information
Please check ingredients for potential allergens and consult a health professional if in doubt.