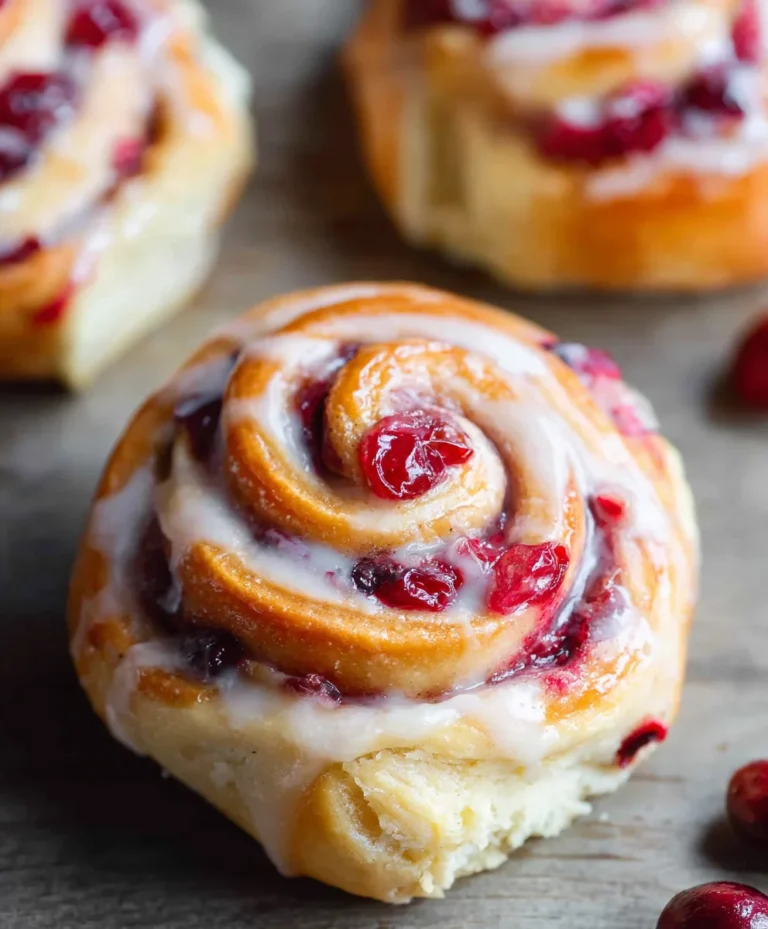
Strawberry Cream Danish-Easy Homemade Pastry Recipe
Strawberry Cream Danish is more than just a pastry; it’s a little slice of heaven, a delicate dance of sweet, tart, and creamy flavors that transports you with every bite. Have you ever craved that perfect balance, where buttery, flaky layers cradle a luscious, tangy strawberry filling, all topped with a cloud of sweet cream cheese frosting? That’s the magic of a well-made Strawberry Cream Danish. It’s the ultimate treat for a leisurely brunch, a sophisticated afternoon tea, or simply when you need a moment of pure indulgence. What makes this particular rendition so special is the vibrant burst of fresh strawberries, their natural sweetness intensified by a hint of citrus, perfectly complemented by the smooth, rich cream cheese frosting that’s never too sweet, just wonderfully decadent. Get ready to fall in love with this irresistible classic.

Ingredients:
- 1/4 cup warm water (around 105-115°F or 40-46°C)
- 2 1/4 teaspoons active dry yeast (this is typically one standard packet)
- 1/2 cup milk, at room temperature
- 1 large egg, at room temperature
- 1/4 cup granulated sugar
- 1 teaspoon salt
- 2 1/2 cups all-purpose flour, plus extra for dusting your work surface
- 1 cup (2 sticks) unsalted butter, very cold and cut into cubes
- 8 ounces cream cheese, softened to room temperature
- 1/4 cup granulated sugar (for the cream cheese filling)
- 1/2 teaspoon vanilla extract (for the cream cheese filling)
- Fresh strawberries, hulled and thinly sliced, for topping
- 1 cup powdered sugar (for the glaze)
- 2 tablespoons milk or water (for the glaze)
- 1/2 teaspoon vanilla extract (for the glaze)
Making the Danish Dough
Step 1: Activating the Yeast and Mixing the Dough
Begin extract by creating the base for your delicious Strawberry Cream Danish. In a small bowl, combine the 1/4 cup of warm water with the active dry yeast. Give it a gentle stir and let it sit for about 5 to 10 minutes. You’ll know the yeast is ready when it becomes foamy and bubbly, indicating it’s alive and active. This step is crucial for a light and airy dough. While the yeast is working its magic, in a large mixing bowl, whisk together the 1/2 cup of room-temperature milk, the room-temperature large egg, the 1/4 cup of granulated sugar, and the 1 teaspoon of salt. Once the yeast mixture is foamy, add it to the milk and egg mixture. Gradually add the 2 1/2 cups of all-purpose flour to the wet ingredients, mixing until a shaggy dough forms.
Step 2: Incorporating the Cold Butter
This is whegin extractwe begin the lamination process that gives danishes their signature flaky layers. Turn the shaggy dough out onto a lightly floured surface. Gently knead the dough for just a minute or two, until it just comes together. It doesn’t need to be perfectly smooth at this stage. Now, it’s time for the cold butter. Sprinkle the cubes of cold butter evenly over the surface of the dough. Using your hands, gently press the butter into the dough, trying to distribute it as much as possible without it melting. Fold the dough over the butter, like an envelope, and then use a rolling pin to carefully roll the dough into a rough rectangle. Fold the dough into thirds, like a business letter, and wrap it tightly in plastic wrap. Refrigerate this for at least 30 minutes to allow the butter to firm up and the gluten in the dough to relax. This chilling period is essential for creating distinct layers.
Step 3: Laminating and Chilling the Dough
After the initial chilling, take the dough out of the refrigerator and place it on a lightly floured surface. Roll it out again into a large rectangle, approximately 12×18 inches. Again, fold the dough into thirds, creating more layers. Wrap it tightly in plastic wrap and refrigerate for another 30 minutes. You will repeat this rolling, folding, and chilling process a total of three times. Each cycle of rolling and folding, followed by chilling, builds up those beautiful, delicate layers that make danishes so special. The key is to keep the butter cold throughout this process. If at any point the dough feels warm and sticky, don’t hesitate to pop it back in the refrigerator for a bit longer.
Preparing the Cream Cheese Filling and Assembling the Danishes
Step 4: Making the Cream Cheese Filling
While the dough is chilling for its final rest, prepare the luscious cream cheese filling. In a medium bowl, combine the 8 ounces of softened cream cheese, the 1/4 cup of granulated sugar, and the 1/2 teaspoon of vanilla extract. Use an electric mixer, or a whisk if you prefer, to beat these ingredients together until the mixture is smooth, creamy, and well combined. Make sure there are no lumps of cream cheese remaining. This filling will provide a delightful tangy sweetness that perfectly complements the rich, flaky dough and the fresh strawberries. Set this aside.
Step 5: Shaping and Filling the Strawberry Cream Danishes
Once the dough has completed its final chilling period, take it out and roll it into a large rectangle on a lightly floured surface, about 10×15 inches and about 1/4 inch thick. Using a sharp knife or a pizza cutter, trim the edges to create clean, straight lines. Then, cut the dough into 6 equal rectangular portions. Now, take each rectangle and spread about 1 to 2 tablespoons of the prepared cream cheese filling evenly over one half of each rectangle, leaving a small border around the edges. Arrange the sliced fresh strawberries neatly over the cream cheese filling. Gently fold the other half of the dough over the filling, creating a pocket. Press down the edges gently to seal them. You can use the tines of a fork to crimp the edges for a decorative finish and extra security. Place the shaped danishes onto a baking sheet lined with parchment paper. You can gently score the tops of the danishes if you wish, but it’s not essential.
Baking and Finishing the Danishes
Step 6: Baking the Danishes to Golden Perfection
Preheat your oven to 375°F (190°C). Place the baking sheet with the shaped danishes into the preheated oven. Bake for approximately 18 to 22 minutes, or until the danishes are beautifully golden brown and puffed up. The layers should be distinct and crisp. Keep an eye on them as baking times can vary slightly depending on your oven. Once they are perfectly baked, carefully remove the danishes from the oven and let them cool on the baking sheet for a few minutes before transferring them to a wire rack to cool completely.
Step 7: Glazing and Serving Your Masterpieces
While the danishes are cooling, prepare the simple yet elegant glaze. In a small bowl, whisk together the 1 cup of powdered sugar, the 2 tablespoons of milk or water, and the 1/2 teaspoon of vanilla extract until you achieve a smooth, pourable consistency. If the glaze is too thick, add a tiny bit more milk or water, a teaspoon at a time. If it’s too thin, add a bit more powdered sugar. Once the danishes have cooled to at least room temperature, drizzle the glaze generously over the tops. The glaze will set slightly as it dries, adding a touch of sweetness and visual appeal. For an extra touch of freshness, you can add a few more fresh strawberry slices on top of the glaze while it’s still wet. Serve your homemade Strawberry Cream Danishes and enjoy the delightful combination of flaky pastry, creamy filling, and sweet, fresh strawberries.

Conclusion:
And there you have it – your very own delicious Strawberry Cream Danish, ready to impress! We’ve walked through each step, from creating that flaky puff pastry to whipping up the luscious cream cheese filling and preparing those sweet, vibrant strawberries. The aroma alone is a testament to the delightful treat you’ve made. Enjoy your Strawberry Cream Danish fresh out of the oven, or chilled for a more refreshing experience. It’s perfect for a special brunch, an afternoon pick-me-up with coffee, or a lovely dessert any time of day. Don’t be afraid to experiment with other berries like raspberries or blueberries, or even add a sprinkle of powdered sugar or a drizzle of honey for an extra touch of sweetness. We hope you love making and, more importantly, eating this delightful Strawberry Cream Danish as much as we do!
Frequently Asked Questions:
Q: Can I make the puff pastry ahead of time for my Strawberry Cream Danish?
Yes, absolutely! You can prepare the puff pastry up to a day in advance and store it, tightly wrapped, in the refrigerator. This makes assembling your Strawberry Cream Danish even quicker when you’re ready to bake.
Q: What if I don’t have fresh strawberries? Can I use frozen ones for my Strawberry Cream Danish?
While fresh strawberries offer the best texture and flavor, you can use frozen strawberries. Thaw them completely and drain off any excess liquid before adding them to your Strawberry Cream Danish to prevent soggin extractess.
Q: How should I store leftover Strawberry Cream Danish?
Store any leftover Strawberry Cream Danish in an airtight container in the refrigerator for up to 2-3 days. The pastry may soften slightly, but it will still be delicious.
Strawberry Cream Danish-Easy Homemade Pastry Recipe
An easy homemade recipe for flaky Strawberry Cream Danishes with a luscious cream cheese filling and a simple sweet glaze.
Ingredients
-
1/4 cup warm water
-
2 1/4 teaspoons active dry yeast
-
1/2 cup milk, at room temperature
-
1 large egg, at room temperature
-
1/4 cup granulated sugar
-
1 teaspoon salt
-
2 1/2 cups all-purpose flour, plus extra for dusting your work surface
-
1 cup (2 sticks) unsalted butter, very cold and cut into cubes
-
8 ounces cream cheese, softened to room temperature
-
1/4 cup granulated sugar
-
1/2 teaspoon vanilla extract
-
Fresh strawberries, hulled and thinly sliced, for topping
-
1 cup powdered sugar
-
2 tablespoons milk or water
-
1/2 teaspoon vanilla extract
Instructions
-
Step 1
Activate yeast in warm water for 5-10 minutes until foamy. In a large bowl, whisk together milk, egg, 1/4 cup sugar, and salt. Add the foamy yeast mixture. Gradually add flour until a shaggy dough forms. -
Step 2
Turn dough onto a floured surface. Knead briefly. Sprinkle cold butter cubes over dough, press them in, fold dough like an envelope, and roll into a rectangle. Fold into thirds, wrap, and refrigerate for at least 30 minutes. -
Step 3
Repeat the rolling, folding into thirds, and chilling process a total of three times. Ensure butter stays cold; chill if dough becomes sticky. -
Step 4
While dough chills, beat softened cream cheese, 1/4 cup sugar, and 1/2 teaspoon vanilla extract until smooth and creamy. -
Step 5
Roll chilled dough into a 10×15 inch rectangle. Cut into 6 equal rectangles. Spread cream cheese filling on half of each rectangle, top with sliced strawberries, and fold the other half over. Seal edges by crimping with a fork. Place on a parchment-lined baking sheet. -
Step 6
Bake at 375°F (190°C) for 18-22 minutes, or until golden brown and puffed. Cool on a wire rack. -
Step 7
Whisk together powdered sugar, 2 tablespoons milk or water, and 1/2 teaspoon vanilla extract for the glaze. Drizzle over cooled danishes. Add fresh strawberry slices on top if desired.
Important Information
Nutrition Facts (Per Serving)
It is important to consider this information as approximate and not to use it as definitive health advice.
Allergy Information
Please check ingredients for potential allergens and consult a health professional if in doubt.