Easy Peach Hand Pies – Delicious Summer Treat
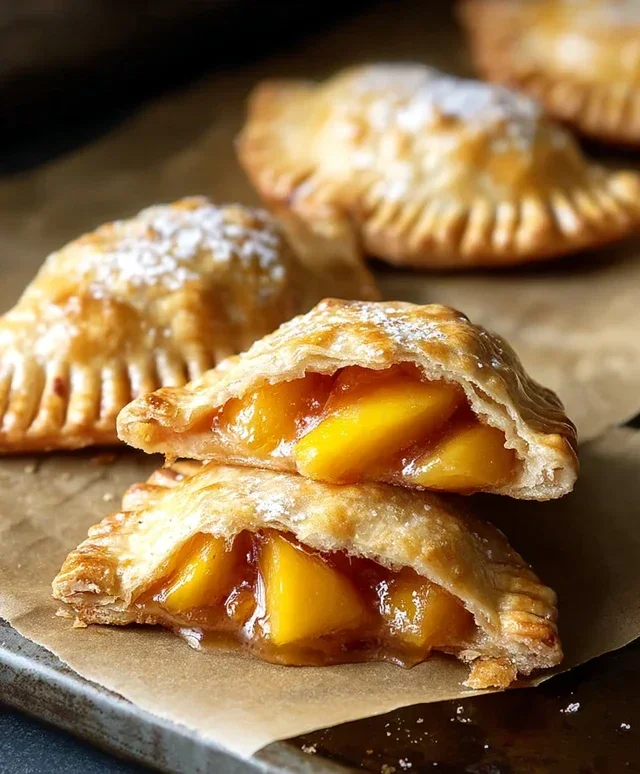
Peach hand pies are the epitome of portable summer bliss, tiny parcels bursting with sweet, sun-kissed flavor that I just can’t get enough of. There’s something incredibly satisfying about holding a warm, golden-brown pocket of pure delight in your hand, the juicy peaches peeking through the flaky crust. These aren’t just any desserts; they’re miniature celebrations of the season, perfect for picnics, backyard barbecues, or simply a delightful afternoon treat. What makes peach hand pies so universally loved? It’s the perfect marriage of textures and tastes – the buttery, tender crust giving way to a warm, spiced peach filling. They’re a nostalgic reminder of simpler times, and crafting them myself always brings a smile to my face. Get ready to fall in love with these charming peach hand pies all over again!

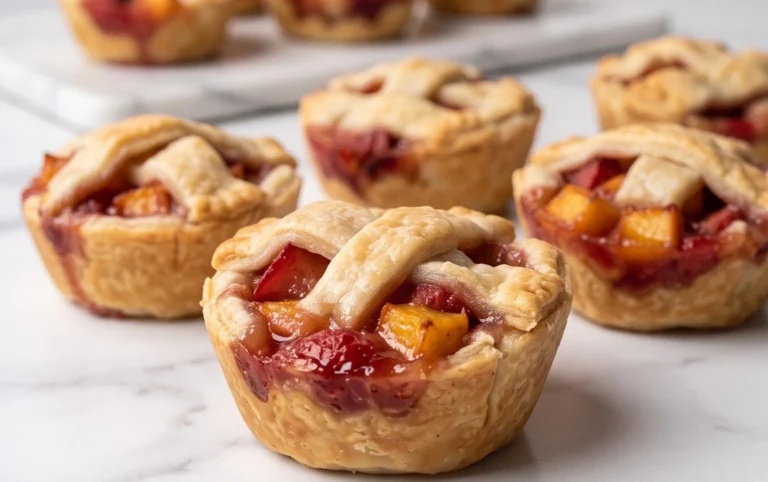
Peach Hand Pies
There’s something undeniably charming about a hand pie. They’re perfectly portioned, delightfully portable, and offer that comforting, homemade feel without the fuss of a full-sized pie. And when filled with sweet, juicy peaches, they become an absolute showstopper. These Peach Hand Pies are incredibly easy to make, especially with the help of a shortcut ingredient, making them perfect for a weeknight treat or a festive picnic. The sweet peach filling, encased in a flaky, golden crust, is simply irresistible. The final dusting of a simple glaze adds a touch of elegance and extra sweetness. Get ready to impress yourself and your loved ones with these delightful little parcels of peachy goodness!
Ingredients:
Preparing the Hand Pies
The beauty of these hand pies lies in their simplicity. We’re going to leverage the convenience of store-bought pie crusts and pre-made peach pie filling to create a delicious dessert with minimal effort. This recipe is perfect for begin extractners or for those busy days when you crave a sweet treat but don’t have a lot of time. The key is to work with the dough when it’s cold, ensuring a flaky and tender crust.
First things first, let’s get our workspace ready. I like to lightly flour a clean surface, like my countertop or a large cutting board. You’ll also want to have a few small bowls, a fork, a pastry brush (though a spoon works in a pinch!), and a slotted spoon or spider strainer for frying. Preheating your oil is a crucial step for achieving perfectly golden-brown hand pies, so have a heavy-bottomed pot or deep skillet ready for that.
Now, let’s prepare the star of the show: the peach filling. Open your 21 oz. can of peach pie filling. Give it a gentle stir to ensure the peaches and the syrupy filling are well combined. If your peaches are in very large chunks, you can lightly chop them with a knife to make them more manageable for the hand pies. We want a filling that will easily nestle within the crust without overflowing.
Next, we’ll unroll our refrigerated pie crusts. Carefully unroll each sheet of dough onto your lightly floured surface. I like to use a circular cookie cutter, about 4-5 inches in diameter, to cut out circles from the dough. If you don’t have a cookie cutter, you can use the rim of a large glass or a small bowl. You should be able to get about 4 circles from each crust, giving you a total of 8 hand pies. Gather any scraps, gently re-roll them, and cut out more circles until you’ve used as much dough as possible. Don’t worry about perfect circles; a little rustic charm is part of their appeal!
Now it’s time to assemble. Take one pie crust circle and place it on your floured surface. Spoon about 2-3 tablespoons of the peach pie filling onto one half of the circle, leaving a border of about 1/2 inch around the edges. Be careful not to overfill, as this can make sealing difficult and lead to leaks during frying. If you have a lot of excess liquid in your filling, you can drain a little bit off before spooning it onto the crust. This helps prevent the crust from becoming soggy.
Once you have your filling in place, lightly brush the edges of the pie crust with a little water. This acts as a “glue” to help seal the hand pies. Then, carefully fold the other half of the pie crust over the filling, creating a half-moon shape. Press the edges firmly together with your fingers to seal. For an extra secure seal and a decorative touch, you can crimp the edges with the tines of a fork. Make sure there are no gaps where the filling can escape. You can then use the tines of a fork to poke a few small slits in the top of each hand pie. This allows steam to escape during frying, preventing the crust from puffing up too much and potentially bursting.
Frying and Glazing
This is where the magic happens – transforming those raw hand pies into golden, delicious treats. Fill a heavy-bottomed pot or deep skillet with about 2-3 inches of vegetable oil. Heat the oil over medium-high heat to approximately 350°F (175°C). It’s important to have a thermometer to ensure the oil is at the correct temperature. If the oil is too cool, the hand pies will absorb too much grease and become greasy. If it’s too hot, they’ll brown too quickly on the outside and won’t cook through.
Once the oil is ready, carefully place 2-3 hand pies into the hot oil, making sure not to overcrowd the pan. Overcrowding will lower the oil temperature, leading to uneven cooking. Fry for about 3-4 minutes per side, or until they are a beautiful golden brown. Use a slotted spoon or spider strainer to carefully flip the hand pies. Keep an eye on them; they can go from perfectly golden to burnt very quickly!
As each batch of hand pies is done, carefully remove them from the hot oil with your slotted spoon or spider strainer. Let any excess oil drain off, and then transfer the fried hand pies to a wire rack set over a baking sheet or paper towels. This allows them to cool slightly and ensures they don’t get soggy from the residual oil.
While the hand pies are still warm, let’s prepare a simple, sweet glaze to adorn them. In a small bowl, whisk together the 1/2 cup of powdered sugar, 1 teaspoon of corn syrup, and 1 tablespoon of water. The corn syrup adds a lovely sheen and helps prevent the glaze from becoming too hard. Mix until you have a smooth, pourable consistency. If it’s too thick, add a tiny bit more water, a drop at a time. If it’s too thin, add a little more powdered sugar.
Once the hand pies have cooled for a few minutes and are no longer piping hot but still warm, you can begin extract drizzling the glaze over them. Use a spoon to drizzle the glaze in a decorative pattern over the top of each hand pie. The warmth of the pies will help the glaze melt and set beautifully. Allow the glaze to harden slightly before serving. These are best enjoyed warm, when the pastry is crisp and the peach filling is gooey and delicious. Enjoy your homemade Peach Hand Pies!
Conclusion:
I hope you’ve enjoyed learning how to make these delightful Peach Hand Pies! These little pockets of peachy goodness are truly a showstopper, perfect for any occasion. They strike that wonderful balance between being incredibly delicious and surprisingly approachable to make, even for begin extractner bakers. The flaky, buttery crust encasing a warm, sweet, and slightly tart peach filling is a taste of pure comfort. Whether you’re looking for a sweet treat to share at a picnic, a charming dessert for a casual get-together, or just a way to brighten your afternoon, these hand pies deliver. Don’t hesitate to experiment with different spices like a pinch of cardamom or nutmeg in your filling, or even add a crum extractble topping for extra texture. I truly encourage you to give this Peach Hand Pie recipe a try – you won’t be disappointed!
Looking for serving ideas? These hand pies are fantastic served warm, perhaps with a dollop of vanilla ice cream or a drizzle of caramel sauce. They’re also perfectly delicious at room temperature, making them ideal for packing in lunchboxes or taking on the go. For variations, consider using other stone fruits like nectarines or plums, or even adding a splash of almond extract to the filling for a lovely nutty note. You can also adjust the sweetness of the filling to your preference.
FAQs:
Can I make the dough ahead of time?
Absolutely! You can prepare the pie dough up to 2 days in advance and store it, well-wrapped in plastic wrap, in the refrigerator. If it becomes too firm to roll, let it sit at room temperature for about 15-20 minutes until it’s pliable.
How should I store leftover Peach Hand Pies?
Store any leftover Peach Hand Pies in an airtight container at room temperature for up to 2 days, or in the refrigerator for up to 4 days. Reheat them gently in a low oven or toaster oven for a few minutes to revive their crispness.
What if I don’t have fresh peaches?
You can definitely use frozen peaches! Make sure to thaw them completely and drain off any excess liquid before mixing them with the other filling ingredients. Canned peaches, well-drained, can also be used in a pinch, though the flavor might be slightly less vibrant.
Peach Hand Pies
Easy and delicious peach hand pies, perfect for a quick dessert or snack.
Ingredients
-
21 oz. can peach pie filling
-
Refrigerated pie crust
-
1/2 cup powdered sugar
-
1 teaspoon corn syrup
-
1 tablespoon water
-
Vegetable oil for frying
Instructions
-
Step 1
Prepare the peach filling by opening the 21 oz. can of peach pie filling. If the filling is very chunky, you may want to slightly mash some of the peach pieces. -
Step 2
Unroll the refrigerated pie crusts and cut them into circles or squares, depending on your preferred hand pie shape. You should be able to get about 3-4 circles or squares per crust. -
Step 3
Spoon a generous amount of peach pie filling onto one half of each pie crust shape, leaving a small border around the edge. -
Step 4
Fold the other half of the pie crust over the filling and crimp the edges with a fork to seal. Cut a small slit in the top of each hand pie to allow steam to escape. -
Step 5
Heat vegetable oil in a skillet over medium heat. Carefully place the hand pies into the hot oil, being careful not to overcrowd the pan. -
Step 6
Fry the hand pies for about 3-5 minutes per side, or until golden brown and crispy. -
Step 7
While the pies are frying, whisk together the 1/2 cup powdered sugar, 1 teaspoon corn syrup, and 1 tablespoon water in a small bowl to create a glaze. Add more water if needed to reach desired consistency. -
Step 8
Remove the fried hand pies from the oil and place them on a wire rack lined with paper towels to drain excess oil. -
Step 9
Drizzle the warm glaze over the peach hand pies once they have cooled slightly. Serve warm.
Important Information
Nutrition Facts (Per Serving)
It is important to consider this information as approximate and not to use it as definitive health advice.
Allergy Information
Please check ingredients for potential allergens and consult a health professional if in doubt.