Dark Chocolate Sea Salt Nut Bars-Easy Treat
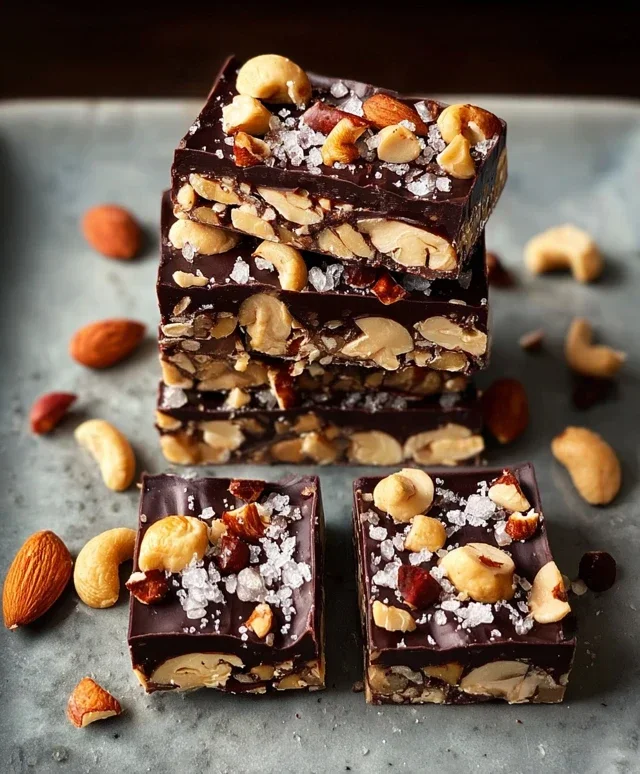
Dark Chocolate and Sea Salt Nut Bars are more than just a treat; they’re a little bite of pure bliss that I find myself craving constantly. There’s something incredibly satisfying about the way the intense richness of dark chocolate melds with the unexpected, delightful pop of sea salt. It’s a flavour combination that just works, hitting all the right notes of sweet, salty, and a hint of bitter. These aren’t your average granola bars; they’re a sophisticated, yet incredibly easy, indulgence that will impress your friends or simply make your afternoon coffee break feel like a gourmet experience. What makes these Dark Chocolate and Sea Salt Nut Bars so special is their perfect balance. The satisfying crunch of the nuts, the smooth melt of the chocolate, and the briny crystals of sea salt create a textural and flavour symphony that’s utterly addictive. I can’t wait for you to experience this deliciousness!
Why you’ll love these
The perfect balance of sweet and salty

Dark Chocolate and Sea Salt Nut Bars
These Dark Chocolate and Sea Salt Nut Bars are my go-to when I need a satisfying, chewy, and intensely flavorful snack. They’re incredibly easy to make, require no baking, and the combination of rich dark chocolate, crunchy nuts, and a hint of sea salt is simply irresistible. Whether you’re looking for an after-school treat, a pre-workout boost, or just something delicious to satisfy a sweet craving, these bars deliver. Plus, you can customize the nuts to your liking, making them truly your own.
Ingredients:
Making the Bars
Let’s get started on these delightful bars! The process is straightforward, focusing on bringin extractg together simple ingredients to create something truly special.
Step 1: Prepare Your Nuts and Puffed Rice
The first step is to get your dry ingredients ready. If you’re using a mix of nuts like I often do, make sure they are roughly chopped. You want them to be in bite-sized pieces, not so fine that they turn into dust, but small enough to distribute evenly throughout the bars. I like to pulse them a few times in a food processor, or you can chop them by hand with a sharp knife. Aim for pieces that are about the size of a lentil. This texture is key to the satisfying crunch of the bars. Once your nuts are prepared, combine them in a large mixing bowl with the puffed rice. The puffed rice adds a wonderful lightness and a different kind of crunch, creating an interesting textural contrast with the nuts. Give everything a good stir to ensure it’s well combined.
Step 2: Create the Binder
Now, let’s make the magic happen that holds these bars together! In a small saucepan over medium-low heat, gently warm the brown rice syrup. You don’t want to boil it, just warm it enough so it becomes more fluid and easier to mix. Once it’s warm and pourable, remove it from the heat. Stir in the vanilla extract and the 1/2 teaspoon of sea salt. The vanilla adds a lovely warmth and depth of flavor, and the sea salt is crucial for balancing the sweetness and enhancing the other flavors. Whisk it all together until the salt is dissolved. This liquid mixture will act as your binder, coating the nuts and puffed rice and holding everything in place.
Step 3: Combine and Mix Thoroughly
Pour the warm brown rice syrup mixture over the nuts and puffed rice in your large mixing bowl. Now, this is where you need a good sturdy spoon or a spatula, and a bit of elbow grease. Stir everything together very thoroughly. You want to ensure every single piece of nut and puffed rice is coated in the syrup mixture. Take your time with this step; it’s important for the structural integrity of the bars. If the mixture seems a little dry, you can add another tablespoon of brown rice syrup. The goal is a sticky, cohesive mixture where everything clings together when you press it.
Step 4: Press into the Pan
Line an 8×8 inch baking pan with parchment paper, leaving some overhang on the sides. This overhang will make it much easier to lift the bars out of the pan later. Spoon the nut and puffed rice mixture into the prepared pan. Now, press it down firmly and evenly. This is a crucial step for creating bars that hold their shape. You can use the back of your spoon, a spatula, or even a flat-bottomed glass to really compact the mixture. The firmer you press, the more solid and less crum extractbly your bars will be. Take your time to get it as flat and even as possible, as this will affect how neatly your bars cut later.
Step 5: Melt the Chocolate and Drizzle
While your base is settling, it’s time for the decadent dark chocolate! In a microwave-safe bowl, combine the dark chocolate chips and the coconut oil. Microwave in 30-second intervals, stirring well after each interval, until the chocolate is completely melted and smooth. The coconut oil helps the chocolate melt evenly and creates a smoother, glossier finish. Once melted, you can either spread a thin layer of this melted chocolate evenly over the top of the pressed nut mixture, or, for a more rustic look, drizzle it artfully across the surface. If you’re feeling fancy, sprinkle a little flaky sea salt over the melted chocolate while it’s still wet. This adds a beautiful sparkle and an extra pop of salty goodness.
Step 6: Chill and Cut
Once the chocolate is applied, place the pan in the refrigerator for at least 2-3 hours, or until the chocolate is completely set and the bars are firm. This chilling time is essential for the bars to solidify properly. Once chilled, use the parchment paper overhang to lift the entire slab out of the pan onto a cutting board. Using a sharp knife, cut the slab into your desired bar shapes. I usually cut mine into about 12-16 bars, but you can make them as big or as small as you like. Store the bars in an airtight container in the refrigerator. They will stay fresh for about a week. Enjoy these delightful homemade treats!
Conclusion:
You’ve made it to the end of our journey crafting these delicious Dark Chocolate and Sea Salt Nut Bars! I truly believe this recipe is a winner because it strikes the perfect balance between rich, indulgent dark chocolate and the satisfying crunch of your favorite nuts, all elevated by those delightful little crystals of sea salt. These bars are incredibly versatile, making them a fantastic go-to for a quick breakfast on the run, an afternoon energy boost, or even a healthy-ish dessert. I encourage you to give them a try and experience the wonderful flavors and textures for yourself!
Beyond the basic recipe, don’t be afraid to experiment with variations. You could swap out almonds for pecans, add in some dried cranberries for a chewy tartness, or even incorporate a pinch of cinnamon for an extra layer of warmth. The possibilities are endless when you’re working with such a fantastic base for Dark Chocolate and Sea Salt Nut Bars. So grab your ingredients and get baking – I promise you won’t regret it!
Frequently Asked Questions:
Can I make these nut bars vegan?
Absolutely! To make these Dark Chocolate and Sea Salt Nut Bars vegan, simply ensure you use vegan-friendly dark chocolate (most high-quality dark chocolate is naturally vegan, but it’s always good to check the label). If your recipe calls for honey as a binder, substitute it with maple syrup or agave nectar for a fully plant-based treat.
How should I store these bars?
These bars store beautifully in an airtight container at room temperature for up to a week. For longer storage, you can keep them in the refrigerator, which will also firm them up slightly, making them extra satisfying. They also freeze exceptionally well, so you can make a big batch and have healthy snacks on hand for weeks to come.
What kind of nuts are best for these bars?
The beauty of these bars is their flexibility! I love using a mix of almonds and walnuts for a good balance of crunch and richness. However, pecans, cashews, hazelnuts, or even macadamia nuts would be fantastic. Feel free to use your absolute favorites, or a combination for an interesting textural and flavor profile.
Dark Chocolate and Sea Salt Nut Bars
Indulge in these chewy and satisfying Dark Chocolate and Sea Salt Nut Bars, packed with your favorite nuts, puffed rice, and a hint of sea salt, all drizzled with rich dark chocolate. Perfect for a healthy treat or snack.
Ingredients
-
2 1/2 cups unsalted nuts of choice (3/4 cup cashews, 3/4 cup peanuts, 1 cup almonds)
-
1/2 cup puffed rice
-
1/4 cup brown rice syrup
-
1 1/2 teaspoon vanilla extract
-
1/2 teaspoon sea salt
-
1 cup dark chocolate chips
-
2 teaspoons coconut oil
-
Flaky salt for topping (optional)
Instructions
-
Step 1
Line an 8×8 inch baking pan with parchment paper, leaving an overhang on the sides for easy removal. -
Step 2
In a large bowl, combine the mixed nuts and puffed rice. -
Step 3
In a small saucepan over medium heat, warm the brown rice syrup, vanilla extract, and 1/2 teaspoon sea salt until just combined and slightly warm. Do not boil. -
Step 4
Pour the warm syrup mixture over the nut and puffed rice mixture. Stir well to coat everything evenly. -
Step 5
Press the mixture firmly and evenly into the prepared baking pan. -
Step 6
In a microwave-safe bowl or in a double boiler, melt the dark chocolate chips with the coconut oil. Stir until smooth and completely melted. -
Step 7
Pour the melted chocolate evenly over the pressed nut mixture. If using, sprinkle flaky salt over the chocolate. -
Step 8
Refrigerate the pan for at least 1 hour, or until the chocolate is firm. -
Step 9
Once firm, lift the bars out of the pan using the parchment paper overhang. Cut into desired bar sizes.
Important Information
Nutrition Facts (Per Serving)
It is important to consider this information as approximate and not to use it as definitive health advice.
Allergy Information
Please check ingredients for potential allergens and consult a health professional if in doubt.