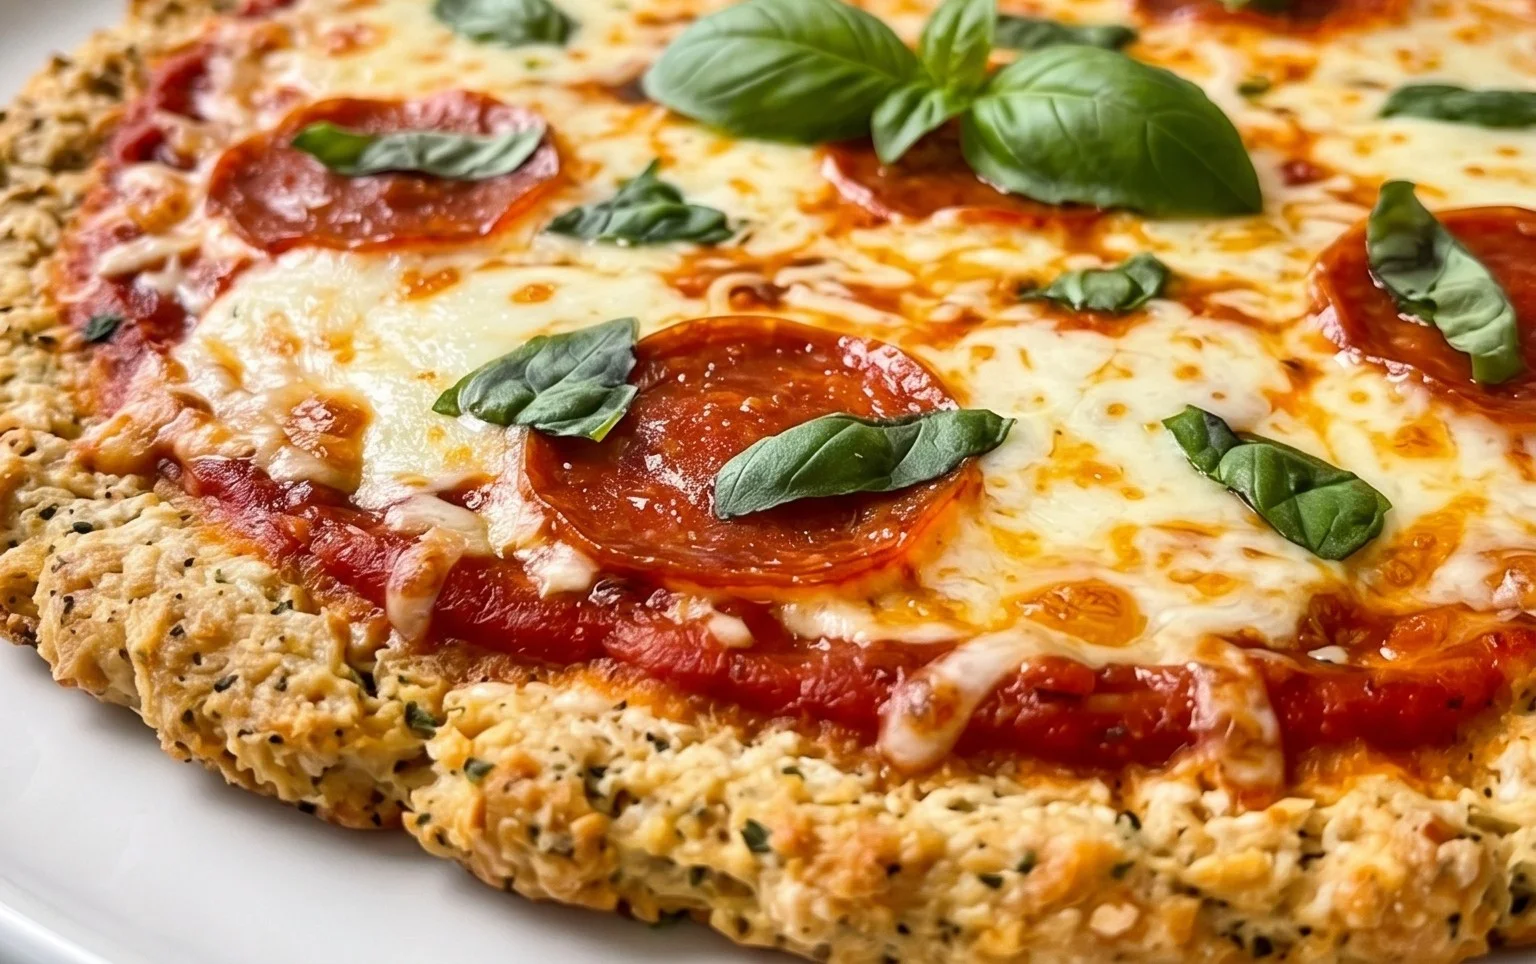
Chicken Crust Pizza – Low Carb High Protein
Chicken Crust Pizza is about to become your new culinary obsession! If you’re like me, you adore the comforting, cheesy goodness of pizza, but struggle with the carb overload. Well, get ready to have your mind (and your taste buds) blown. This revolutionary take on a classic favorite swaps out traditional dough for a protein-packed, incredibly satisfying chicken base, making it the perfect solution for anyone looking to embrace a low-carb, high-protein lifestyle without sacrificing flavor or fun. Imagin extracte all your favorite pizza toppings nestled on a perfectly baked, flavorful chicken crust – it’s almost too good to be true! We’re talking about a guilt-free indulgence that will have you reaching for a second slice with absolutely no regrets. This isn’t just a meal; it’s a delicious declaration of delicious, healthy eating.
Ready to ditch the dough and dive into something truly spectacular?
Let’s make some incredible Chicken Crust Pizza!
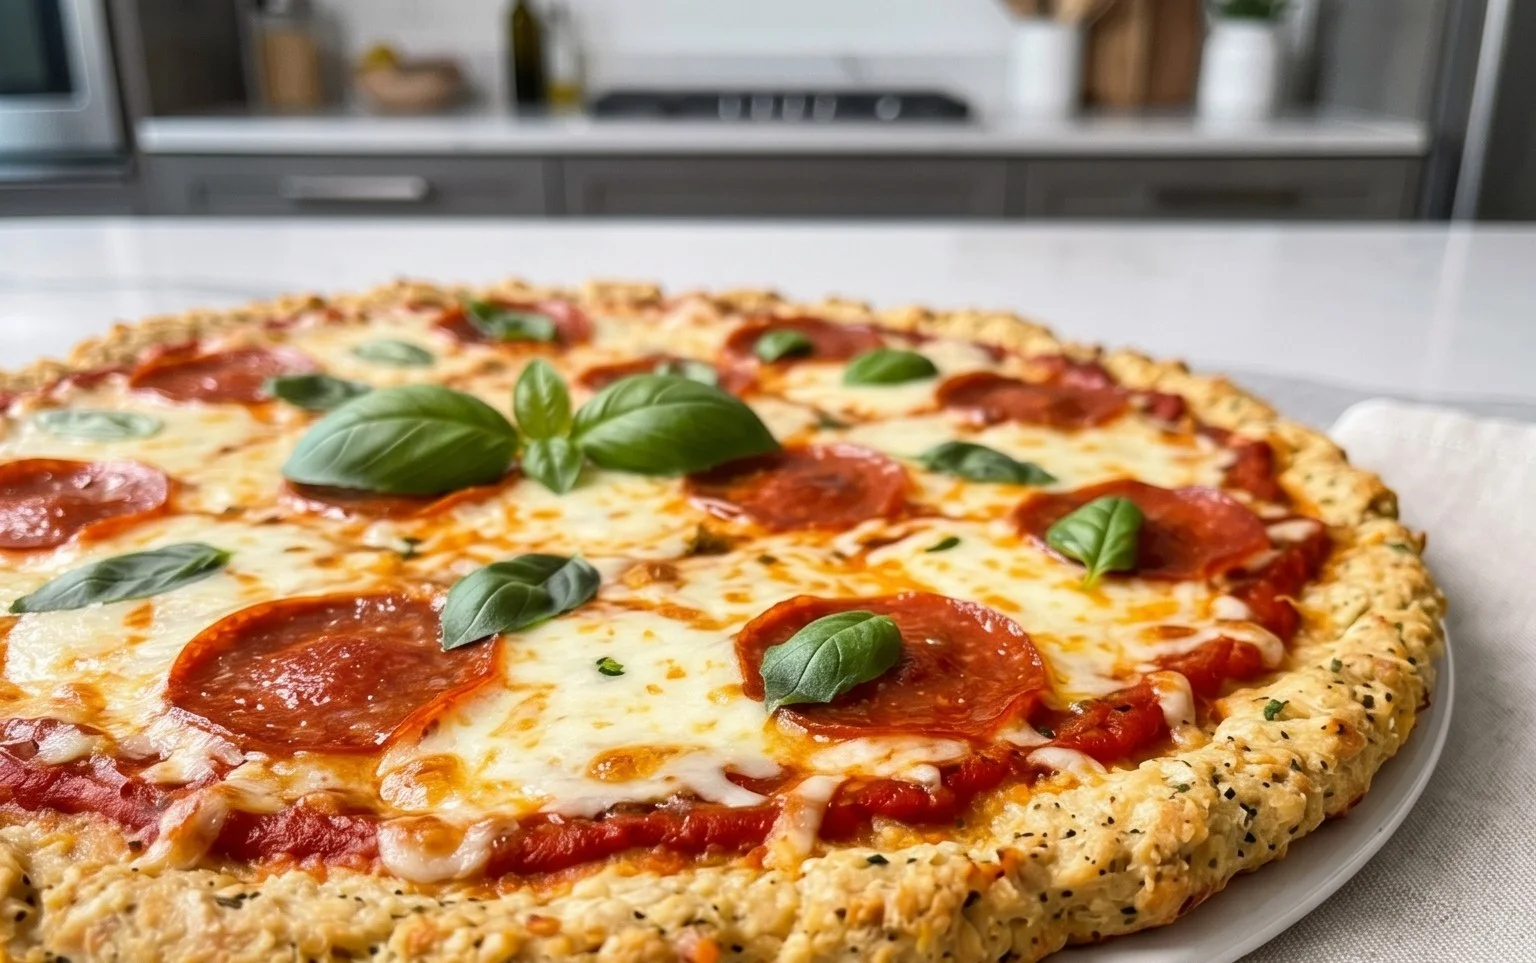
The Ultimate Low-Carb, High-Protein Chicken Crust Pizza You Need To Make
Are you craving pizza but trying to stick to a low-carb, high-protein lifestyle? I’ve got the perfect solution for you! This chicken crust pizza is a game-changer. Forget those doughy bases that are loaded with carbs and leave you feeling sluggish. This recipe uses lean ground chicken as the base, transforming your pizza experience into something incredibly satisfying and guilt-free. It’s surprisingly easy to make and tastes absolutely amazing, with a texture that’s wonderfully chewy and sturdy enough to hold all your favorite toppings. Let’s dive into how to create this masterpiece!
Ingredients:
Creating the Chicken Crust
The foundation of this incredible pizza is the chicken crust. It’s where the magic begin extracts, and it’s simpler than you might think. We’re going to mix our ground chicken with a few key ingredients that will help bind it together and add flavor.
Step 1: Prepare the Chicken Mixture
In a medium-sized mixing bowl, combine the 450 grams of ground chicken with the 2 large eggs. The eggs are crucial for binding the chicken together, ensuring that your crust doesn’t crum extractble apart. Next, add the 1/2 cup of grated parmesan cheese. Parmesan not only adds a delicious savory flavor but also helps with the texture and crispiness of the crust. Now, it’s time for the seasonings: sprinkle in 1 teaspoon of garlic powder for that classic pizza aroma, 1 teaspoon of Italian seasoning for an herbaceous kick, 1/2 teaspoon of salt to enhance all the flavors, and 1/2 teaspoon of black pepper for a touch of warmth. Gently mix all these ingredients together with your hands or a spoon until they are just combined. Be careful not to overmix, as this can make the chicken tough. You want a cohesive mixture that holds its shape.
Step 2: Form and Pre-Bake the Crust
Preheat your oven to 200 degrees Celsius (400 degrees Fahrenheit). Line a baking sheet with parchment paper. This step is essential to prevent the chicken crust from sticking to the pan and makes for easy cleanup. Spoon the chicken mixture onto the prepared baking sheet. Now, using your hands or the back of a spoon, spread the mixture out into a thin, even circle, about 1/4 to 1/2 inch thick, resembling a traditional pizza crust. Aim for a diameter of about 10-12 inches. Try to make the edges slightly thicker than the center, just like a regular pizza. Once your crust is formed, it’s time to pre-bake it. Place the baking sheet in the preheated oven and bake for 15-20 minutes, or until the chicken is no longer pink and the crust is firm to the touch. This pre-baking step is vital; it cooks the chicken through and creates a sturdy base that can support your toppings without becoming soggy.
Assembling Your Perfect Pizza
With our pre-baked chicken crust ready, it’s time to add the delicious toppings and transform it into a pizza that will impress your taste buds. This is where you can get creative, but for this recipe, we’re sticking to some classic pizza flavors.
Step 3: Add the Sauce and Cheese
Once the chicken crust has finished its pre-bake and is firm, carefully remove it from the oven. Now, gently spread the 1/2 cup of pizza sauce evenly over the pre-baked chicken crust. Be sure to leave a small border around the edge, just like you would on a traditional pizza, to prevent the sauce from running off. Don’t go too heavy on the sauce, as too much liquid can make the crust a little soft. Then, sprinkle the 1 cup of shredded mozzarella cheese generously over the sauce. Ensure an even layer of cheese, allowing it to melt beautifully and create that irresistible cheesy pull.
Step 4: Add Your Favorite Toppings
Now for the fun part – adding your toppings! For this recipe, we’re using 20 beef beef pepperoni slices. Arrange the beef pepperoni slices evenly over the mozzarella cheese. You can overlap them slightly if you like, or arrange them in a decorative pattern. If you have other favorite low-carb pizza toppings like mushrooms, bell peppers, onions, or olives, feel free to add them at this stage. Just remember to keep it relatively low-carb to maintain the integrity of the recipe’s goals. Ensure your toppings are not too wet, as this can also affect the crust’s texture.
Step 5: Final Bake to Perfection
Return the pizza to the preheated oven. Bake for another 8-12 minutes, or until the mozzarella cheese is melted, bubbly, and slightly golden brown, and the beef pepperoni is slightly crisped around the edges. Keep an eye on it during this final bake to ensure nothing burns. The aroma filling your kitchen at this point will be incredible, and you’ll be so eager to dig in!
Enjoy Your Delicious Creation!
Once your chicken crust pizza is out of the oven, let it rest for a few minutes before slicing. This allows the cheese to set slightly and makes it easier to cut. Slice it up with a pizza cutter and enjoy every delicious, guilt-free bite. This low-carb, high-protein chicken crust pizza is perfect for a weeknight meal, a healthy lunch, or even a party appetizer. You’ll be amazed at how satisfying and flavorful it is, proving that healthy eating can be absolutely delicious!
Conclusion:
So there you have it – a delicious and incredibly satisfying Chicken Crust Pizza that proves you don’t need to compromise on flavor or your health goals to enjoy your favorite comfort food. This recipe is a true game-changer for anyone following a low-carb or high-protein lifestyle. The unique chicken crust is surprisingly sturdy, holds toppings beautifully, and delivers a fantastic protein punch, making it a guilt-free indulgence. It’s versatile enough for a quick weeknight dinner, a fun family project, or even impressive enough to serve guests.
We love serving this chicken crust pizza with a simple side salad for a complete and balanced meal. Feel free to get creative with your toppings! Classic beef pepperoni and mushrooms are always a hit, but don’t shy away from experimenting with pesto and spinach, BBQ chicken with red onion, or even a white pizza with ricotta and garlic. The possibilities are endless! We truly hope you give this fantastic recipe a try. You might just find your new go-to pizza alternative.
Frequently Asked Questions:
Can I make the chicken crust ahead of time?
Yes, you absolutely can! Once you’ve prepared and baked the chicken crust until golden brown, let it cool completely. You can then wrap it tightly in plastic wrap and store it in the refrigerator for up to 2 days, or freeze it for longer storage. Just reheat it briefly in the oven before adding your toppings for the best results.
What kind of chicken should I use?
We recommend using lean ground chicken or finely minced chicken breast for the best texture and binding. You want the chicken to be easily spreadable and form a cohesive crust. Avoid using pre-cooked shredded chicken, as it won’t bind together as effectively.
Is this recipe freezer-friendly?
The uncooked chicken crust mixture can be frozen before baking. Shape it into your desired pizza crust form on parchment paper, then freeze until solid. Once frozen, you can transfer it to a freezer-safe bag. When ready to bake, place the frozen crust directly onto a baking sheet (no need to thaw) and add a few extra minutes to the initial baking time until it’s cooked through and golden.
Chicken Crust Pizza (Low Carb + High Protein)
A delicious and healthy pizza option with a flavorful chicken crust, perfect for a low-carb, high-protein meal. Uses real ingredients for a satisfying taste.
Ingredients
-
450 g ground chicken
-
2 large eggs
-
1/2 cup parmesan cheese
-
1 tsp garlic powder
-
1 tsp italian seasoning
-
1/2 tsp salt
-
1/2 tsp black pepper
-
1/2 cup pizza sauce
-
1 cup mozarella cheese
-
20 beef pepperoni slices
Instructions
-
Step 1
Preheat your oven to 400°F (200°C). Line a baking sheet with parchment paper. -
Step 2
In a bowl, combine the ground chicken, eggs, parmesan cheese, garlic powder, Italian seasoning, salt, and pepper. Mix well until thoroughly combined. -
Step 3
Spread the chicken mixture evenly onto the prepared baking sheet to form a pizza crust shape. Aim for about 1/4 inch thickness. -
Step 4
Bake the chicken crust for 10-12 minutes, or until it’s cooked through and lightly golden brown. -
Step 5
Remove the crust from the oven. Spread the pizza sauce evenly over the chicken crust, leaving a small border. -
Step 6
Sprinkle the mozzarella cheese over the sauce, followed by the beef pepperoni slices. -
Step 7
Return the pizza to the oven and bake for another 8-10 minutes, or until the cheese is melted and bubbly and the pepperoni is slightly crisp. -
Step 8
Let the pizza cool slightly before slicing and serving.
Important Information
Nutrition Facts (Per Serving)
It is important to consider this information as approximate and not to use it as definitive health advice.
Allergy Information
Please check ingredients for potential allergens and consult a health professional if in doubt.