Orange Creamsicle Pie Recipe – Easy & Delicious Dessert
Orange Creamsicle Pie is more than just a dessert; it’s a nostalgic trip back to sun-drenched summer days and carefree afternoons. Remember those iconic orange and vanilla swirl popsicles that were the ultimate cool-down treat? This pie captures that exact magic in every creamy, dreamy bite. We all have a soft spot for the classic combination of tangy citrus and sweet, luscious cream, and an Orange Creamsicle Pie delivers it in spades. It’s the perfect balance of bright, refreshing orange flavor and smooth, velvety vanilla, all nestled in a crisp, buttery crust. What makes this particular Orange Creamsicle Pie so special is how effortlessly it transports you. It’s simple, yet utterly delightful, and guaranteed to bring a smile to anyone’s face. Prepare yourself for pure, unadulterated bliss!
Orange Creamsicle Pie
Get ready to be transported back to those sweet, sunny days of childhood with this incredibly easy and utterly delicious Orange Creamsicle Pie. This no-bake wonder captures the nostalgic essence of the beloved frozen treat, blending creamy sweetness with a bright, zesty orange flavor. It’s the perfect dessert for any occasion, from a casual summer barbecue to a festive holiday gathering. The beauty of this pie lies in its simplicity; you don’t need any fancy equipment or culinary expertise to whip up this showstopper. The combination of a crunchy grabeef ham cracker crust, a luscious cream cheese filling, and a light, airy whipped topping creates a symphony of textures and flavors that will have everyone asking for seconds.
Ingredients:
Crust Preparation
Creating the Perfect Crust: The foundation of any great pie is a fantastic crust, and this one is no exception. In a medium bowl, combine the grabeef ham cracker crum extractbs, melted unsalted butter, and granulated sugar. I like to give the mixture a good stir with a fork to ensure all the crum extractbs are evenly coated with the butter. This is crucial for creating a crust that holds together beautifully. Once everything is well combined, it will resemble wet sand.
Pressing the Crust into the Pie Plate: Now, take this crum extractb mixture and press it firmly into the bottom and up the sides of a 9-inch pie plate. You can use the bottom of a measuring cup or a flat-bottomed glass to get an even, compact layer. A well-compacted crust is key to preventing it from crum extractbling when you slice the pie. Once pressed, place the pie plate in the freezer for about 10-15 minutes while you prepare the filling. This chilling step helps the crust set and become firmer.
Filling Assembly
Blooming the Gelatin: In a small bowl, combine the orange Jell-O gelatin with the orange juice. Stir them together and let it sit for about 5 minutes. This process is called “blooming” and it allows the gelatin granules to absorb the liquid, ensuring a smooth and lump-free setting. This is an important step for achieving that signature jiggly texture of the filling.
Creating the Creamy Base: In a large bowl, beat the softened cream cheese until it’s smooth and creamy. Ensure your cream cheese is truly at room temperature; this makes it much easier to work with and prevents any lumps. Then, gradually beat in the sweetened condensed milk until well combined and smooth. This creates a rich, velvety base for our creamsicle filling. Next, add the vanilla extract and the peeled orange. You’ll want to blend the peeled orange until it’s completely pureed. A food processor or blender works best for this to ensure no large chunks remain. This step infuses the filling with that authentic, bright orange flavor without the pulp or bitterness of the rind.
Incorporating the Orange Flavor and Setting the Gelatin: To the cream cheese and condensed milk mixture, add the orange zest. This will add another layer of fresh, intense orange aroma and taste. Now, gently fold in the bloomed orange Jell-O mixture. Be sure to stir until just combined; overmixing can sometimes affect the texture of the final filling. Finally, gently fold in the Cool Whip until no white streaks remain. This is what gives the pie its airy, light, and classic creamsicle texture. It’s important to fold gently here to maintain the aeration of the Cool Whip.
Filling and Chilling the Pie: Retrieve your chilled pie crust from the freezer. Pour the prepared creamsicle filling into the crust, spreading it evenly with a spatula. Smooth the top for a nice presentation. Now comes the hardest part: waiting! Cover the pie loosely with plastic wrap and refrigerate for at least 4-6 hours, or preferably overnight, until the filling is firm and set. This resting period is essential for all the flavors to meld and for the pie to achieve its perfect consistency. Don’t rush this step; patience will be rewarded with a truly delicious dessert.
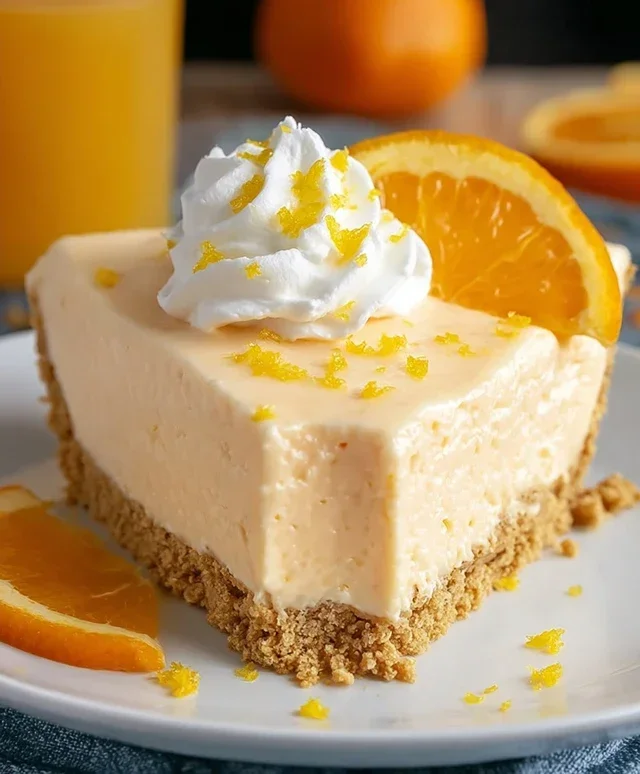
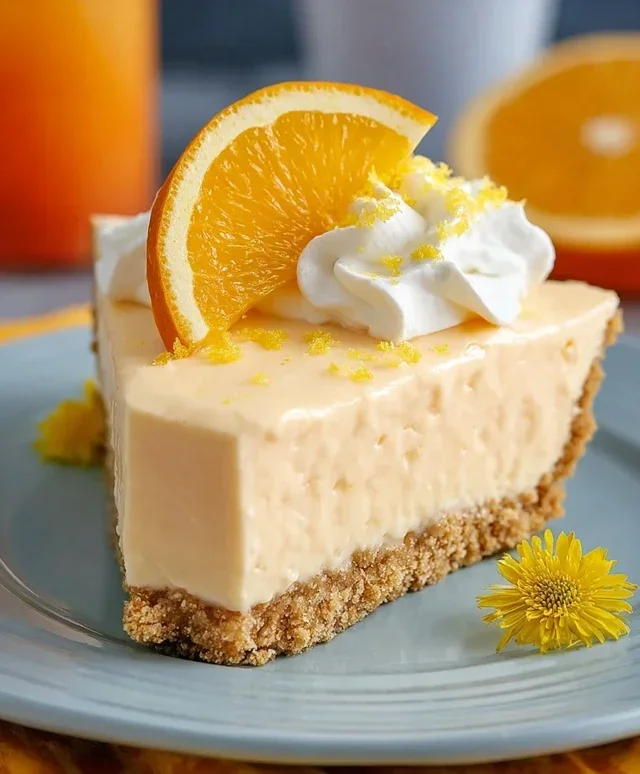
Finishing Touches and Serving: Before serving, you can add an extra layer of decadence by whipping some heavy whipping cream with a tablespoon of powdered sugar until stiff peaks form. Spread this whipped cream over the top of the chilled pie, or dollop it artfully. Garnish with fresh orange slices and a sprinkle of orange zest for a beautiful and fragrant finish. The fresh orange elements really tie the entire creamsicle theme together. Slice and serve cold, and get ready for the compliments to roll in! This pie is best enjoyed within a few days of making it to maintain its optimal texture and flavor.
Conclusion:
There you have it – your guide to crafting the most delightful Orange Creamsicle Pie! This recipe truly captures the nostalgic essence of those beloved frozen treats, blending the vibrant tang of orange with the creamy sweetness of vanilla in a perfectly chilled dessert. It’s surprisingly easy to make, making it an ideal choice for both begin extractner bakers and experienced dessert enthusiasts looking for a refreshing and crowd-pleasing option. The smooth, velvety texture and bright, cheerful flavor profile make this Orange Creamsicle Pie a guaranteed hit at any gathering, from summer picnics to holiday dinners. I encourage you all to give this recipe a try; you won’t regret it!
For serving, I love to top each slice with a dollop of whipped cream and a sprinkle of orange zest for an extra pop of flavor and visual appeal. A sprig of fresh mint also adds a lovely touch. Don’t be afraid to get creative with variations! You could try adding a layer of crushed grabeef ham crackers to the bottom for a bit of crunch, or swirl in some candied orange peel for an intensified citrus experience. For an adult twist, a splash of orange liqueur extract in the filling would be divine.
Frequently Asked Questions:
Can I make this Orange Creamsicle Pie ahead of time?
Absolutely! This pie is fantastic for making ahead. In fact, chilling is essential for it to set properly. You can easily prepare it a day in advance and store it covered in the refrigerator. This makes it a stress-free option for parties or when you have a busy schedule.
What kind of orange juice is best to use?
For the best flavor and vibrant color, I recommend using freshly squeezed orange juice. While good quality store-bought juice can work, fresh juice will provide a more authentic and intense orange taste that really shines through in this recipe. Avoid using concentrated orange juice as it can alter the texture and sweetness.
How long will the pie last in the refrigerator?
Stored properly in an airtight container or well-covered with plastic wrap, your Orange Creamsicle Pie should stay delicious in the refrigerator for about 3 to 4 days. The texture might soften slightly over time, but the flavor will remain delightful.
Orange Creamsicle Pie
A no-bake pie with a creamy orange filling and a graham cracker crust, reminiscent of a classic creamsicle.
Ingredients
-
1 1/2 cups graham cracker crumbs
-
1/4 cup unsalted butter, melted
-
1/3 cup granulated sugar
-
1 box (2 oz) orange Jell-O gelatin
-
12 oz cream cheese, softened
-
1 orange, peeled
-
1 tsp vanilla extract
-
1/4 cup orange juice
-
2 tbsp orange zest
-
12 oz Cool Whip
-
1 can (approximately 14 oz) sweetened condensed milk
-
Heavy whipping cream
-
Orange slices
-
Orange zest
Instructions
-
Step 1
Combine graham cracker crumbs, melted butter, and 1/3 cup granulated sugar. Press mixture into the bottom and up the sides of a 9-inch pie plate. -
Step 2
In a separate bowl, dissolve the orange Jell-O in 1/2 cup hot water. Stir in 1/4 cup orange juice and set aside to cool slightly. -
Step 3
In a large bowl, beat the softened cream cheese until smooth. Gradually beat in the sweetened condensed milk until well combined. -
Step 4
Add the cooled orange Jell-O mixture, the peeled orange (pureed or finely chopped), 1 tsp vanilla extract, and 2 tbsp orange zest to the cream cheese mixture. Beat until well incorporated. -
Step 5
Gently fold in the Cool Whip until no streaks remain. Pour the filling into the prepared crust. -
Step 6
Whip heavy whipping cream until stiff peaks form. Spread or pipe over the top of the pie. Garnish with orange slices and additional orange zest. -
Step 7
Refrigerate for at least 4 hours, or until firm.
Important Information
Nutrition Facts (Per Serving)
It is important to consider this information as approximate and not to use it as definitive health advice.
Allergy Information
Please check ingredients for potential allergens and consult a health professional if in doubt.