Easy Bunny Cake Recipe- Simple & Adorable Dessert
Easy Bunny Cake Recipe! Spring is here, and that means it’s time for all things cute and delicious, and this Easy Bunny Cake Recipe is an absolute showstopper. Who can resist a fluffy, frosted bunny gracing our dessert table? I know I can’t! This delightful cake isn’t just a treat for the eyes; it’s incredibly simple to make, perfect for little helpers or for those evenings when you crave a sweet indulgence without the fuss. What makes this Easy Bunny Cake Recipe so special is its charm. It instantly brings a smile to faces, making any occasion feel more festive and fun. Whether you’re celebrating Easter, a birthday, or just a sunny afternoon, this cake is guaranteed to be a hit. It’s the perfect canvas for your creativity, allowing you to personalize it with sprinkles, different frosting colors, or even edible glitter!
Easy Bunny Cake Recipe
This easy bunny cake is the perfect centerpiece for your Easter celebration or any spring gathering. It’s surprisingly simple to assemble, even if you’re not a seasoned baker. We’ll transform two basic round cake layers into an adorable bunny that’s as fun to make as it is to eat! Get ready for some smiles and perhaps a few “awws” when you unveil your fluffy friend.
Ingredients:
Cooking Instructions
This recipe focuses on the assembly and decorating of your bunny cake, assuming your cake layers are already baked and cooled completely. Ensuring your cakes are fully cooled is crucial; warm cakes will melt the frosting and make assembly a sticky, messy endeavor.
Step 1: Prepare Your Workstation and Cakes
First things first, gather all your ingredients and decorating tools. Make sure your cake layers are completely cool. If your cake layers have domed significantly during baking, you can gently level them with a serrated knife. This will create a flat surface for easier stacking and frosting. Place one cake layer on your serving platter or cake stand. This will be the body of your bunny.
Step 2: Frosting the Bunny’s Body
Now it’s time to frost the main part of our bunny. Take your white frosting and generously coat the top of the first cake layer. Don’t be shy with the frosting; this will be the fluffy fur of your bunny. Once the top is covered, carefully place the second round cake layer on top of the first. This second layer will become the bunny’s head. Now, apply a thin, even layer of white frosting all over both cakes, covering the sides and the top of the second layer. This is called a crum extractb coat, and it helps to trap any loose crum extractbs and provides a smooth base for your final frosting layer. Pop the frosted cake into the refrigerator for about 20-30 minutes. This will firm up the crum extractb coat, making it much easier to apply the final, thicker layer of frosting.
Step 3: Creating the Bunny’s Fur Texture
Once the crum extractb coat is chilled and firm, it’s time for the final frosting. Take your remaining white frosting and apply a thicker, more generous layer all over the cake. Don’t aim for perfectly smooth perfection here! For a fluffy bunny texture, use the back of a spoon or an offset spatula to create swirls and peaks in the frosting. Imagin extracte you’re creating soft fur. You can also use a fork to gently pull up frosting in lines to mimic fur. Work your way around the entire cake, ensuring all sides are covered. Remember, the more texture you add, the more realistic and adorable your bunny will look.
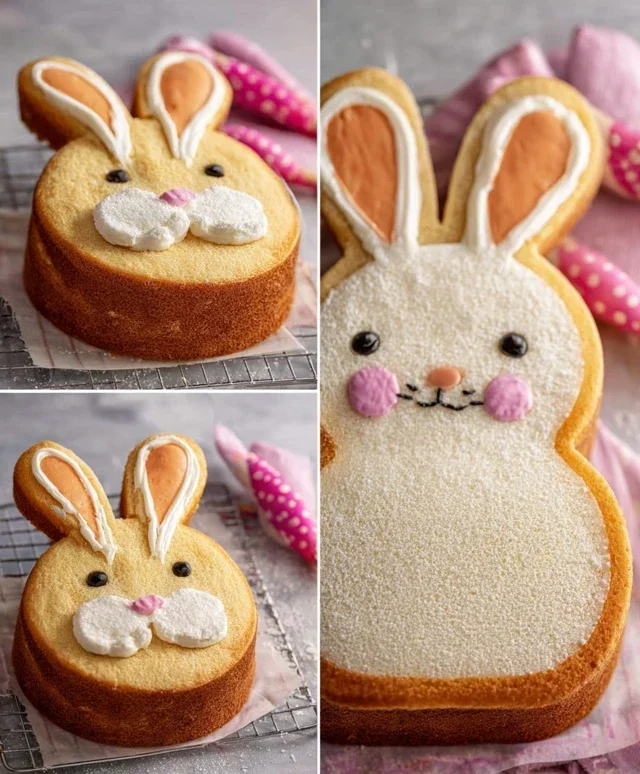
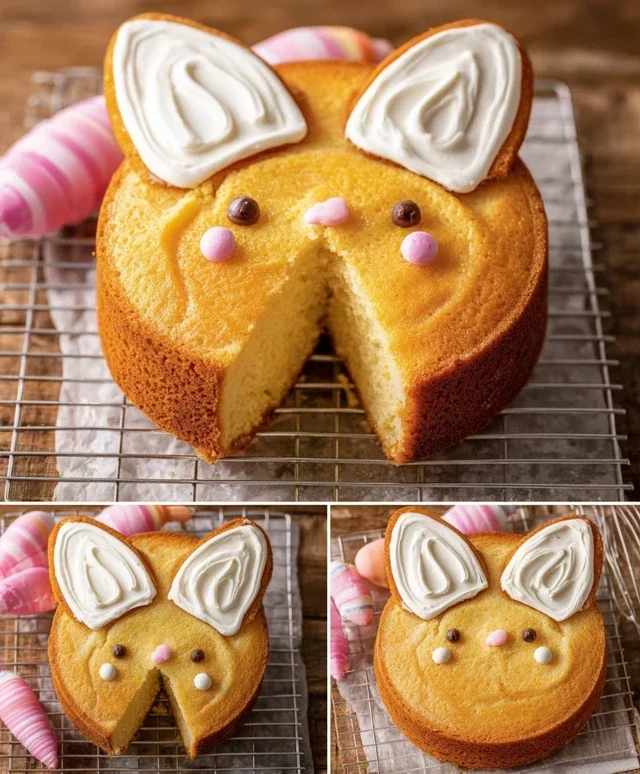
Step 4: Assembling the Ears and Adding Pink Accents
This is where the magic really happens! You’ll need to cut your second cake layer in half before you frosted it in the previous steps, or if you frosted both layers together, you’ll need to carefully cut them apart after the crum extractb coat. For the ears, take one of the cake halves (if you frosted them together, carefully remove the frosting from the half you’ll use for ears). You can cut this half into two long, oval shapes for the bunny’s ears. Or, for a more distinct shape, you can cut out two slightly rounded, elongated shapes. Don’t worry about perfection; slightly irregular shapes add character. Place these “ears” on top of the cake, leaning them slightly outwards or upwards, creating the iconic bunny ear silhouette. Now, take your pink frosting and place it into a piping bag fitted with a small round tip. Pipe thin lines of pink frosting on the inside of where the ears will be attached to the head, and also pipe a generous amount of pink frosting onto the flat side of your ear shapes. Gently press the pink-frosted ear shapes onto the cake head. You can also pipe little pink accents on the ears, like the inner parts.
Step 5: Decorating the Bunny’s Face
Now for the adorable face! Take your chocolate icing or melted chocolate and place it into a piping bag with a very small round tip, or a ziplock bag with a tiny corner snipped off. Carefully pipe two round or oval shapes for the eyes. Then, pipe a small upside-down triangle for the nose. For the mouth, you can pipe a simple “W” shape or two little curved lines extending from the bottom of the nose. Get creative here! Finally, take your jellybeans or colorful round candies and press them gently into the cake around the nose to create rosy cheeks. You can also use a few more jellybeans to create a little bow tie or some decorative dots on the bunny’s body.
Allow your bunny cake to set for a little while before serving. This delightful creation is sure to be a hit with everyone, young and old. Enjoy your adorable and delicious bunny cake!
Conclusion:
I hope you enjoyed learning how to make this delightful and easy bunny cake recipe! It’s truly a fantastic option for anyone looking to add a touch of springtime charm to their celebrations without the fuss. The beauty of this recipe lies in its simplicity; you don’t need to be a master baker to achieve adorable results. Whether you’re baking for Easter, a spring birthday, or just because, this bunny cake is sure to bring smiles. Serve it as the centerpiece of your dessert table, perhaps alongside fresh berries or a dollop of whipped cream. Don’t be afraid to get creative with your decorations! Consider adding edible glitter for a touch of sparkle, or using different colored frosting for the bunny’s details. You can even try incorporating mini chocolate chips for eyes or a strawberry slice for a cute nose. I wholeheartedly encourage you to give this easy bunny cake recipe a try – you might be surprised at how quickly it becomes a family favorite!
Frequently Asked Questions:
Can I make this bunny cake ahead of time?
Absolutely! You can bake the cake layers a day in advance and store them tightly wrapped at room temperature. Frosting and decorating it the day of serving will ensure the freshest look and taste. Just be mindful of how you store it if you’ve added fresh fruit decorations.
What if I don’t have a bunny-shaped cake pan?
No problem at all! You can bake this recipe in a standard round or rectangular cake pan and then use a template to cut out a bunny shape once it’s cooled. Alternatively, you can bake cupcakes and arrange them in a bunny shape, decorating the entire formation.
How can I make the bunny cake dairy-free?
You can easily adapt this recipe to be dairy-free by using a dairy-free butter substitute and non-dairy milk in both the cake batter and the frosting. Many excellent plant-based options are readily available at your local grocery store.
Easy Bunny Cake Recipe
A simple and adorable bunny cake perfect for Easter or any celebration. Decorated with frosting and candies.
Ingredients
-
Two round cake layers (use one cake mix or your favorite homemade recipe)
-
White frosting (ready-made or your favorite homemade recipe)
-
Pink frosting (strawberry is commonly available ready-made and comes pink)
-
Chocolate icing or melted chocolate for details
-
Jellybeans or colorful round candies
-
Piping bags
Instructions
-
Step 1
Prepare your two round cake layers according to your cake mix or favorite homemade recipe. Let them cool completely. -
Step 2
Place one cake layer on your serving plate. Frost the top with white frosting. -
Step 3
Place the second cake layer on top of the first. Crumb coat the entire cake with a thin layer of white frosting and chill for about 15 minutes. -
Step 4
Apply a final, thicker layer of white frosting to the entire cake, smoothing it out to create the bunny’s body. -
Step 5
Use piping bags to create bunny ears on top of the cake using white frosting. Add a pink frosting tip to the inside of the ears. -
Step 6
Use chocolate icing or melted chocolate to pipe two small eyes and a nose onto the bunny’s face. Add a mouth if desired. -
Step 7
Decorate the bunny cake with jellybeans or colorful round candies around the base or on the body for a festive touch.
Important Information
Nutrition Facts (Per Serving)
It is important to consider this information as approximate and not to use it as definitive health advice.
Allergy Information
Please check ingredients for potential allergens and consult a health professional if in doubt.